Delicious Chocolate Chunk Cookies Recipe
- Time: Active 15 minutes, Passive 10 minutes, Total 25 minutes
- Flavor/Texture Hook: Toffee like depth with a shatter crisp edge and molten center
- Perfect for: Aesthetic content creators or anyone hosting a chic weekend brunch
- Achieving Success With This Delicious Chocolate Chunk Cookies Recipe
- Essential Culinary Specifications and Detailed Performance Comparison
- Strategic Component Analysis of This Signature Dough
- Handpicked Elements Required for This Viral Worthy Batch
- Curated Tools for Achieving Professional Baking Results
- Step-by-Step Guide to Crafting These Stunning Cookies
- Correcting Common Flaws for Flawless Cookie Results
- Sophisticated Variations to Try for Different Aesthetics
- Strategic Guidelines for Scaling the Recipe Down or Up
- Preserving Your Batch and Reducing Kitchen Waste
- Exquisite Plating Levels to Enhance Your Presentation
- Debunking Common Kitchen Myths About Cookie Dough
- Recipe FAQs
- 📝 Recipe Card
Achieving Success With This Delicious Chocolate Chunk Cookies Recipe
Imagine the sound of a heavy chef's knife hitting a block of premium dark chocolate. It doesn't just slice; it shatters into a chaotic mix of huge chunks, tiny slivers, and fine cocoa dust. That’s the exact moment I realized my baking game was about to transform.
I used to rely on those uniform, store-bought chips, but they always felt a bit too "safe" for the look I wanted to achieve in my kitchen.
When I first pulled a tray of these from the oven, the aroma of toasted hazelnuts and vanilla bean hit me before I even saw them. The butter had been browned until it reached a deep amber hue, and the way it interacted with the dark brown sugar created a scent that was almost intoxicating.
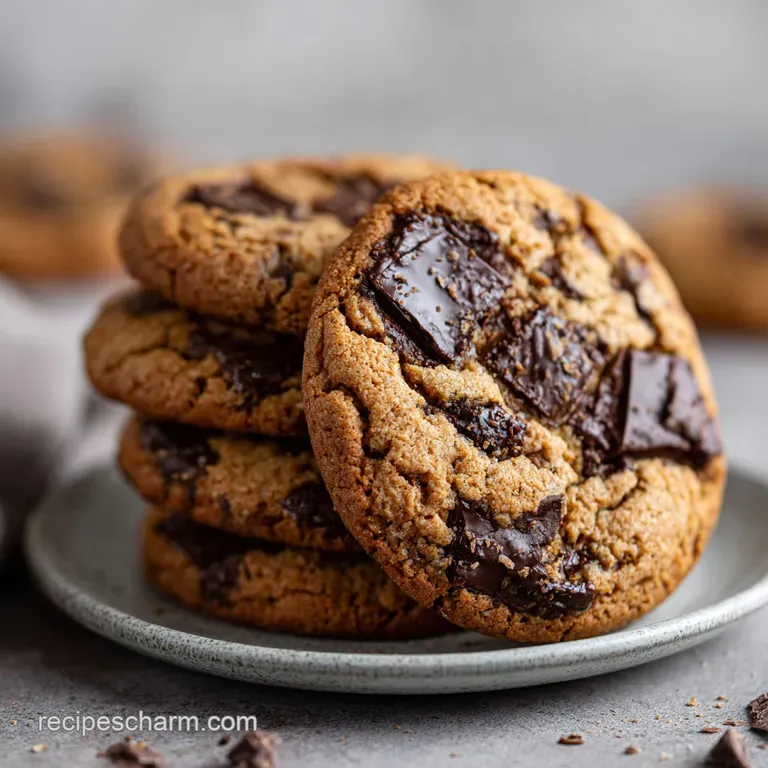
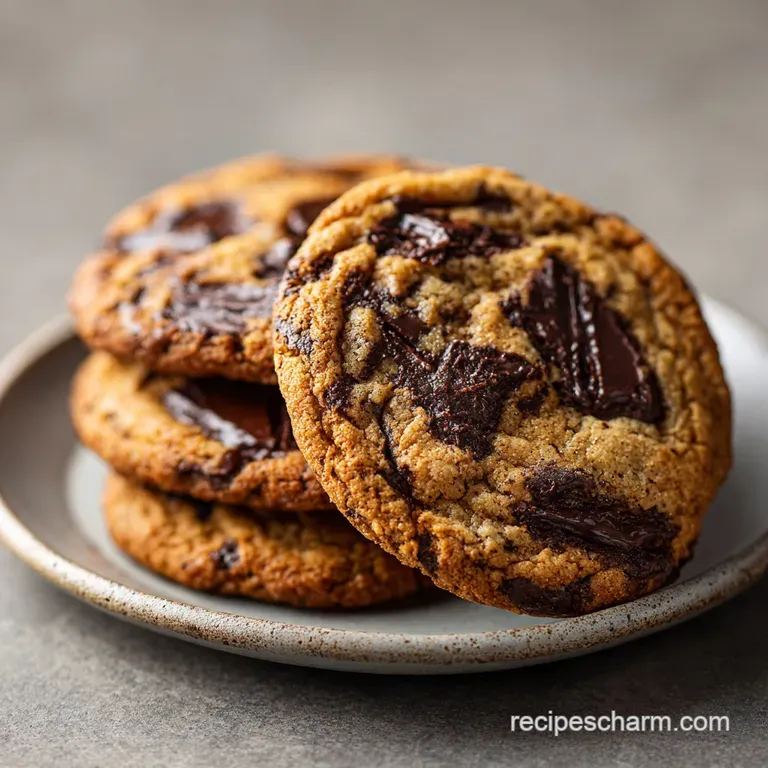
These aren't just snacks; they are a visual statement. We’ve all seen the viral worthy photos of cookies with massive pools of chocolate, and I’m going to show you exactly how to get that result every single time.
This specific method is about more than just mixing ingredients. It’s about understanding how temperature and fat ratios create that stunning, crinkly surface. If you’ve ever felt like your cookies were a bit flat or lacked that "wow" factor, you’re in the right place.
We're moving past the basics and diving into the techniques that make a dish look like it belongs in a high end editorial spread.
Essential Culinary Specifications and Detailed Performance Comparison
When you are aiming for a result that looks as good as it tastes, you need to understand your heat source. While most of us default to the oven, there is a certain charm to a stovetop preparation if you are looking for a different texture profile.
| Method | Cook Time | Texture Profile | Best Visual For |
|---|---|---|---|
| Standard Oven | 10 minutes | Uniform gold with soft center | Classic Instagram worthy stacks |
| Cast Iron Stovetop | 15 minutes | Ultra crisp bottom, gooey top | Rustic, "deep dish" skillet shots |
Choosing the right method depends on the vibe you're going for. The oven provides that controlled environment needed for the perfect spread, while the stovetop version often done in a small skillet offers a more indulgent, velvety texture that is hard to beat when served warm with a scoop of gelato.
The Physics of the Puddle
Using hand chopped chocolate bars creates varying melting points and surface areas compared to stabilized chips. This allows the cocoa butter to bleed slightly into the surrounding dough, creating those coveted, glossy chocolate pools.
Chef Tip: Freeze your chocolate bar for 10 minutes before chopping. This prevents the heat from your hands or the knife friction from melting the edges, keeping those "shards" distinct until they hit the oven heat.
Strategic Component Analysis of This Signature Dough
Before we get to the mixing, we need to talk about what actually happens inside that bowl. Selecting the right ingredients isn't just about the brand; it's about the chemistry they bring to the table.
For instance, the choice of dark brown sugar over light brown sugar drastically changes the moisture content and the final color of the bake.
| Component | Science Role | Pro Secret |
|---|---|---|
| Unsalted Butter | Fat & Flavor | Brown it to remove water and intensify the nutty notes. |
| Egg Yolk (Extra) | Emulsifier | Adds fat without water, creating a fudgy, velvety bite. |
| Cornstarch | Softener | Breaks up gluten bonds to ensure the center remains tender. |
| Dark Brown Sugar | Humectant | The high molasses content creates the chewy, mahogany finish. |
Each of these elements works in harmony to ensure the cookie doesn't just crumble away. If you find yourself enjoying the texture of our Classic Peanut Butter recipe, you'll notice that the balance of fats here is even more focused on that "melt in-your mouth" sensation.
Handpicked Elements Required for This Viral Worthy Batch
To get the results we’re looking for, precision is everything. I always suggest using a digital scale if you have one, but if not, the "spoon and level" method for your flour is non negotiable.
- 1 cup (225g) unsalted butter: Why this? Allows you to control the salt levels and browning depth perfectly.
- Substitute: Vegan butter sticks (ensure high fat content for similar spread).
- 1 cup (200g) dark brown sugar, packed: Why this? Provides the moisture needed for a chewy, dense texture.
- Substitute: Light brown sugar mixed with 1 tsp molasses.
- 1/2 cup (100g) granulated white sugar: Why this? Encourages the edges to crisp up and shatter beautifully.
- Substitute: Raw cane sugar for a slightly more textured crunch.
- 1 tbsp pure vanilla extract: Why this? A high volume of vanilla is the secret to that "bakery" scent.
- Substitute: Vanilla bean paste for those gorgeous black speckles.
- 1 large egg + 1 yolk (room temp): Why this? The extra yolk is the key to the fudgy center.
- Substitute: 1/4 cup applesauce (Note: Result will be much cakeier).
- 2 1/4 cups (280g) all purpose flour: Why this? Provides the structural framework for the "chunk" inclusions.
- Substitute: 1:1 gluten-free baking flour (look for Xanthan gum in the blend).
- 1 tsp cornstarch & 1 tsp baking soda: Why this? Soda aids browning; starch keeps it soft.
- 1/2 tsp sea salt: Why this? Sharpness to cut through the heavy sugar and fat.
- 8 oz (225g) dark chocolate bars: Why this? Chopped chunks create a far superior visual than standard chips.
| Premium Ingredient | Budget Alternative | Flavor Impact | Savings |
|---|---|---|---|
| Valrhona Chocolate | Semi sweet Baking Bar | Slightly less fruity/acidic | $5.00 - $7.00 |
| Grass fed Butter | Standard Store Brand | Less creamy mouthfeel | $2.00 - $3.00 |
| Vanilla Bean Paste | Imitation Vanilla | Lacks floral depth | $4.00 - $6.00 |
Setting up your station properly is half the battle. If you've ever tried making a Chocolate Chip Cookie recipe into a giant cake, you know that the quality of your chocolate determines the final "glow" of the dish.
Curated Tools for Achieving Professional Baking Results
You don't need a professional kitchen, but a few specific tools will make your life much easier and your photos much cleaner.
- Heavy bottomed saucepan: Essential for browning the butter without scorching it.
- Electric hand mixer or stand mixer: I usually use my KitchenAid to ensure the sugar and butter are fully emulsified.
- Large baking sheets: Light colored aluminum is best; dark pans tend to burn the bottoms before the centers are set.
- Silicone mats or parchment paper: This ensures a clean release and prevents the chocolate from sticking to the tray.
- A 2 ounce cookie scoop: This is the secret to getting those perfectly uniform, round shapes that look so stunning on a plate.
step-by-step Guide to Crafting These Stunning Cookies
Now we get to the fun part. Follow these steps closely, especially the cooling times, because temperature management is the difference between a greasy mess and a masterpiece.
- Brown the butter. Melt the 1 cup of butter in a pan over medium heat, whisking constantly until it smells nutty and shows brown specks. Note: This takes about 5-8 minutes.
- Cool the fat. Pour the browned butter into a large bowl and let it sit for 10 minutes. Note: If it's too hot, it will melt the sugar and ruin the emulsion.
- Cream the sugars. Add the dark brown and white sugars to the butter. Beat for 2 minutes until the mixture looks like wet sand.
- Incorporate the eggs. Add the egg, extra yolk, and vanilla extract. Beat on high for another 2 minutes until the batter turns pale and fluffy.
- Whisk dry ingredients. In a separate bowl, combine flour, cornstarch, baking soda, and salt.
- Combine the mixtures. Fold the dry ingredients into the wet until just a few streaks of flour remain. Note: Overmixing leads to tough, bready cookies.
- Fold the chocolate. Toss in those 8 oz of hand chopped chocolate shards.
- Chill the dough. Refrigerate for at least 30 minutes. Note: This prevents excessive spreading and deepens the flavor profile.
- Scoop and bake. Space dough balls 3 inches apart on a tray. Bake at 350°F (180°C) for 10 minutes until the edges are set but the center looks slightly underdone.
- Finish with salt. Sprinkle with flaky sea salt immediately after removing from the oven while the chocolate is still molten.
Precision Checkpoints for the Perfect Bake
- Butter Temp: 75°F (24°C) before adding sugar.
- Dough Ball Weight: 55 grams for that "bakery size" look.
- Internal Cookie Temp: 175°F (80°C) when pulled from the oven.
Correcting Common Flaws for Flawless Cookie Results
Even the best of us hit a snag sometimes. If your cookies aren't looking quite like the photos, it's usually a small technical tweak that's needed.
Why Your Cookies Spread Too Much
If your delicious chocolate chunk cookies recipe results in a flat puddle, your butter was likely too warm when you started mixing, or you skipped the chilling step. When the fat is already near its melting point before it hits the oven, it won't hold the air bubbles created during the creaming process.
To Fix a Dry or Crumbly Texture
This usually happens from over measuring the flour. If you pack the flour into the measuring cup, you can end up with 20% more than needed. Always fluff the flour first and use a spoon to fill the cup.
| Problem | Root Cause | Solution |
|---|---|---|
| Greasy bottom | Butter was fully melted/separated | Chill dough for an extra hour before baking. |
| No "pools" of chocolate | Using stabilized chips | Switch to chopped high-quality chocolate bars. |
| Tough, hard bite | Overworking the dough | Fold dry ingredients by hand until just combined. |
Common Mistakes Checklist: ✓ Ensure eggs are at room temperature to prevent the butter from seizing. ✓ Don't skip the extra egg yolk; it's the secret to the velvety crumb.
✓ Preheat your oven for at least 20 minutes to ensure a true 350°F (180°C). ✓ Use a "scoot" technique: place a circular cutter over a warm cookie and move it in a circle to create perfectly round edges.
Sophisticated Variations to Try for Different Aesthetics
Once you've mastered the base, you can play with the "look" of your cookies to suit different occasions or photo styles.
For a Salted Caramel Twist
Press a small piece of soft caramel into the center of the dough ball before baking. As it heats, the caramel will burst through the surface, creating a stunning gold and brown contrast with the dark chocolate.
For a Nutty Crunch
Toast 1/2 cup of pecans or walnuts and fold them in with the chocolate. To keep it looking high end, leave the nuts in large halves rather than chopping them into dust. This adds a architectural element to the cookie's surface.
The "Adult" Style
For a sophisticated, less sweet profile, use 85% cacao chocolate and add a teaspoon of espresso powder to the dry ingredients. This deepens the color of the dough to a rich umami brown and pairs beautifully with a glass of red wine.
Strategic Guidelines for Scaling the Recipe Down or Up
Sometimes you only want a few cookies for a date night, or perhaps you're catering a large event. Scaling isn't always a 1:1 ratio when it comes to baking chemistry.
- Scaling DOWN (1/2 Batch): Use the full egg yolk but whisk the whole egg in a small cup and use only half of it. Use a smaller mixing bowl to ensure the beaters can properly aerate the butter.
- Scaling UP (2x Batch): Keep the salt and baking soda at 1.5x the original amount to avoid a chemical aftertaste. Work in batches for the baking process never crowd more than two trays in the oven at once, as this drops the internal temperature too significantly.
Preserving Your Batch and Reducing Kitchen Waste
You've put in the work, now make sure those cookies stay fresh. These are just as good on day three if stored correctly.
- Storage: Keep in an airtight glass jar at room temperature for up to 4 days. Throw a piece of white bread into the jar; the cookies will absorb the moisture from the bread to stay soft.
- Freezing: You can freeze the baked cookies for up to 2 months. However, for that "freshly shattered" chocolate look, it’s better to freeze the raw dough balls. They can be baked directly from frozen just add 2 minutes to the cook time.
- Zero Waste: Don't throw away the chocolate dust left on your cutting board! Save those tiny shavings and whisk them into your morning coffee or sprinkle them over a bowl of yogurt.
Exquisite Plating Levels to Enhance Your Presentation
Since we are focusing on that viral worthy look, let's talk about how to actually serve these.
| Level | Plating Style | Key Feature |
|---|---|---|
| Simple | The "Stacked" Look | 3 cookies stacked offset on a wooden board. |
| Polished | The "Minimalist" | Single cookie on a matte black plate with a side of cold milk. |
| Restaurant | The "Indulgent" | Warm cookie in a mini skillet, topped with gelato and ganache. |
The Classic Pairing
While milk is the traditional choice, a cold brew coffee or a glass of oat milk with a dash of cinnamon can make the experience feel much more curated. If you're looking for something fruitier to balance the richness, serving these alongside a Pineapple Upside Sugar recipe provides a beautiful contrast in both color and flavor for a dessert spread.
Debunking Common Kitchen Myths About Cookie Dough
There’s a lot of noise out there about what makes a cookie "good." Let's clear up a few things so you can bake with confidence.
Myth: You must cream butter and sugar for 10 minutes. In reality, over creaming for this specific recipe can incorporate too much air, causing the cookies to puff up like cake and then collapse into a wrinkled mess. Two to three minutes is plenty to dissolve the sugar without over aerating.
Myth: Room temperature butter is always best. Actually, for this "melted and browned" method, we are intentionally breaking the emulsion to create a different fat structure. This results in a much denser, fudgier bite than the traditional softened butter method.
Myth: Silpat mats are better than parchment. While mats are eco friendly, they can actually cause cookies to spread more because they are "slippery." For the most consistent, crinkly edged results, good old-fashioned parchment paper provides just enough friction to help the dough hold its shape as it
expands.

Recipe FAQs
Can I substitute milk chocolate for the dark chocolate chunks?
No, for this specific recipe, stick to dark chocolate. Milk chocolate contains more sugar and stabilizers, which will make the pools less glossy and overly sweet, compromising the intended bittersweet balance.
How to stop my cookies from spreading too thin in the oven?
Chill the dough for at least 30 minutes before baking. Cold fat melts slower, giving the dough structure time to set before the butter fully liquefies, which prevents excess spreading.
How to achieve the signature cracked, crinkly top texture?
Use a high ratio of dark brown sugar and incorporate an extra egg yolk. The molasses in the brown sugar keeps the exterior moist while the high heat cracks the surface as the center puffs and then settles.
Is it necessary to brown the butter, or can I use it melted?
No, browning is critical for achieving the desired toffee like depth of flavor. Simply melting the butter yields a pale, flat taste; browning removes water content and develops nutty compounds that define this cookie.
How long can I store the raw dough balls before baking?
Refrigerate the raw dough balls for up to 72 hours for optimal flavor development. The resting period allows the flour to fully hydrate, deepening the flavor complexity, similar to the slow fermentation in our Amish Friendship Bread recipe.
How do I make sure the finished cookies look bakery style and uniform?
Use a 2-ounce cookie scoop and gently scoot the edges post bake. After pulling the trays out, immediately place a round cookie cutter (slightly larger than the cookie) over the warm dough and gently rotate it to create a perfect circle.
Should I use a stand mixer or a hand mixer for creaming the butter and sugar?
A stand mixer is recommended for efficiency, but a powerful hand mixer will work. Ensure you are beating for a full two minutes until the mixture is visibly lighter in color to properly incorporate air necessary for the cookie structure.
Chocolate Chunk Cookies Chewy
Ingredients:
Instructions:
Nutrition Facts:
| Calories | 288 kcal |
|---|---|
| Protein | 2.7 g |
| Fat | 15.0 g |
| Carbs | 35.8 g |
| Fiber | 1.1 g |
| Sugar | 22.5 g |
| Sodium | 127 mg |
