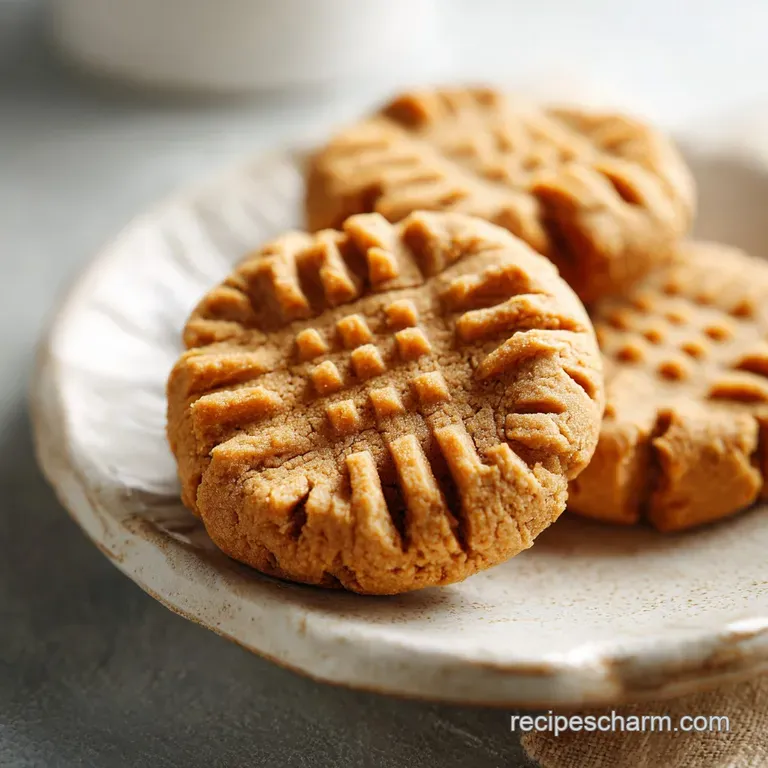
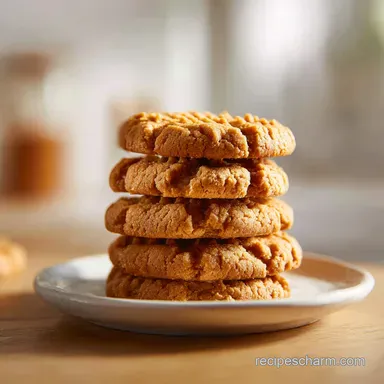
Classic Peanut Butter Cookies: Old Fashioned Chewy
- Time: Active 10 minutes, Passive 10 minutes, Total 20 minutes
- Flavor/Texture Hook: Toasty, nutty shatter with a velvety center
- Perfect for: School bake sales, hearty family snacks, or beginner bakers
- Master the Best Classic Peanut Butter Cookies
- The Logic Behind the Salty Sweetness
- Testing Common Baking and Heat Methods
- Deep Dive into Essential Cookie Components
- Pantry Staples for Your Cookie Tin
- Minimal Tools for a Quick Cleanup
- Mixing and Shaping the Perfect Dough
- Fixing Common Cookie Texture and Spread
- Smart Swaps for Every Modern Kitchen
- Safe Storage and Freezing Guide Tips
- Flavor Pairings for Your Ultimate Snack
- Recipe FAQs
- 📝 Recipe Card
Master the Best Classic Peanut Butter Cookies
The smell of a warm kitchen on a rainy Saturday is hard to beat, especially when it's filled with the scent of toasted peanuts and browning butter. I remember standing on a wooden stool, watching my grandmother whip together these exact ingredients with nothing but a sturdy fork and a bit of muscle.
There was no fancy gear, just that iconic clink clink sound of the fork tines hitting the side of the ceramic bowl.
We’d wait by the oven door, watching the dough balls slowly slump into thick discs, the cross hatches widening as the heat worked its magic. These aren't dainty cookies; they’re hearty, flavor packed rounds that demand a cold glass of milk.
I’ve tried the "fancy" versions with sea salt flakes and expensive nut butters, but honestly, nothing beats this old school method for that specific, sandy shatter we all crave.
This recipe is my go to when the pantry looks bare but the family is hovering for a treat. It uses basic staples you definitely have on hand right now. We're going for a texture that is sturdy enough for a lunchbox but tender enough to crumble perfectly when you take that first bite.
Let's get the oven preheated and walk through how to make these beauties without any fuss or specialized gadgets.
The Logic Behind the Salty Sweetness
Protein Stability: The proteins in commercial peanut butter act as a secondary structure, preventing the cookie from becoming too greasy or thin.
Maillard Reaction: The combination of high protein in the nuts and the sugars creates deep browning at 350°F (180°C), resulting in a toasty, complex flavor profile.
Leavening Balance: Using baking soda instead of powder allows the acidity of the brown sugar to react instantly, giving the cookie a dense but tender lift.
Testing Common Baking and Heat Methods
| Baking Method | Total Time | Visual Cue | Final Texture |
|---|---|---|---|
| Standard Oven | 10 minutes | Light tan edges | Crisp snap with soft core |
| Stovetop Skillet | 15 minutes | Bubbling edges | Gooey, pudding like center |
| Convection Oven | 8 minutes | Deep golden brown | Uniformly crunchy throughout |
Whether you want a classic cookie or a shareable skillet treat, the heat source changes the game. If you choose the stovetop method, use a cast iron pan and keep the heat low to avoid scorching the bottom before the middle sets.
For the most reliable results that yield that perfect 24 cookie batch, the standard oven is your best friend.
Deep Dive into Essential Cookie Components
| Ingredient | Science Role | Pro Secret |
|---|---|---|
| Creamy Peanut Butter | Primary Fat/Structure | Avoid "natural" oils on-top brands; they separate during baking. |
| Light Brown Sugar | Moisture/Chew | Pack it tightly to ensure the molasses content keeps the center soft. |
| Baking Soda | Aeration/Browning | Sift it with the flour to avoid bitter, soapy clumps in the dough. |
| Large Egg | Binding/Emulsifier | Use room temperature eggs so the fats don't seize up during mixing. |
Each component works in harmony to create that specific "shortbread" feel that defines a classic peanut butter cookie. If you're looking for something with a bit more of a spring flair, you might also enjoy the bright notes in my and Tasty Spring recipe.
Pantry Staples for Your Cookie Tin
- 1.5 cups (190g) all purpose flour: Provides the base structure. Why this? Keeps the cookie from being too oily or crumbly. (Sub: White whole wheat for a nuttier bite)
- 1 tsp (5g) baking soda: The lifting agent. Why this? Reacts with the brown sugar for a perfect rise. (Sub: 3 tsp baking powder if soda is out)
- 0.5 tsp (3g) sea salt: Sharpens the peanut flavor. Why this? Balances the heavy sugar content. (Sub: Table salt, but use 1/4 tsp)
- 0.5 cup (113g) unsalted butter, softened: Adds a velvety mouthfeel. Why this? Real butter creates better flavor than shortening. (Sub: Vegan butter sticks)
- 1 cup (250g) creamy peanut butter: The star ingredient. Why this? Standard commercial brands like Jif or Skippy provide consistent fat ratios. (Sub: Crunchy PB for extra texture)
- 0.5 cup (100g) granulated sugar: For the crisp edges. Why this? Helps create the "snap" when you bite in. (Sub: Extra brown sugar for a softer cookie)
- 0.5 cup (100g) light brown sugar, packed: For the chewy center. Why this? Molasses keeps the cookie moist. (Sub: Dark brown sugar for deeper caramel notes)
- 1 large egg (50g): Binds everything together. Why this? Adds richness and prevents the cookie from falling apart. (Sub: 1/4 cup unsweetened applesauce)
- 1 tsp (4g) vanilla extract: The flavor bridge. Why this? Rounds out the salt and sugar. (Sub: Almond extract for a cherry like twist)
Minimal Tools for a Quick Cleanup

For this recipe, we aren't pulling out the heavy stand mixer unless you really want to. A simple large mixing bowl and a sturdy wooden spoon or a handheld whisk are all you need. I actually prefer mixing by hand because you can feel the moment the sugar "grinds" into the butter and finally becomes velvety.
You'll also need a standard baking sheet I like the half sheet size and some parchment paper to prevent sticking. The only other "special" tool is a dinner fork. This is the secret to the traditional look, and it actually serves a purpose: the fork marks flatten the dough evenly so the cookies bake at the same rate.
This minimal setup means you'll have the dishes done before the timer even goes off.
Mixing and Shaping the Perfect Dough
- Prep the heat. Preheat your oven to 350°F (180°C) until the indicator light clicks off. Note: A fully preheated oven is vital for the initial "puff".
- Cream the fats. In your large bowl, beat the softened butter, granulated sugar, and brown sugar until the mixture looks pale and velvety.
- Incorporate the peanut butter. Stir in the 1 cup of creamy peanut butter, the egg, and the vanilla until completely smooth and glossy.
- Whisk the dry bits. In a separate small bowl (or right on top if you're brave), toss the flour, baking soda, and sea salt together.
- Combine the masses. Gradually add the flour mixture to the wet ingredients, stirring until no white streaks of flour remain. Note: Don't overmix here, or the cookies will get tough.
- Roll the rounds. Scoop about 1 tablespoon of dough and roll it between your palms until you have a smooth, golf ball sized sphere.
- Create the pattern. Place balls 2 inches apart on the tray. Use a fork to press down firmly, then turn 90 degrees and press again until you see a clear cross hatch pattern.
- Bake to gold. Slide the tray into the oven for 10 minutes until the edges are just turning a light tan.
- Set the crumb. Let the cookies rest on the hot pan for 5 minutes until they feel firm enough to move.
- Cool completely. Transfer to a wire rack to finish cooling until the centers are set and the bottoms are crisp.
Fixing Common Cookie Texture and Spread
Managing Excessive Dough Spread
If your cookies come out looking like thin pancakes rather than thick discs, the butter was likely too warm. When the fat melts before the flour structure sets, the dough loses its battle against gravity. Always ensure your butter is "cool room temp" soft enough to indent with a finger, but not greasy or shiny.
| Problem | Root Cause | Solution |
|---|---|---|
| Sandy/Crumbly | Too much flour | Spoon flour into the measuring cup instead of scooping. |
| Hard/Rock like | Overbaked | Take them out when the centers still look slightly "wet". |
| Oily Bottoms | Natural PB used | Stick to commercial brands or add 2 tbsp extra flour. |
Preventing Common Baking Mistakes
- ✓ Always use room temperature eggs to prevent the butter from curdling during the creaming stage.
- ✓ Measure your flour by weight (190g) if possible to avoid a dry, choking texture.
- ✓ Don't skip the 5 minute rest on the baking sheet; the residual heat finishes the cooking process.
- ✓ Keep your dough in the fridge between batches if your kitchen is particularly warm.
- ✓ Use a light colored aluminum baking sheet to prevent the bottoms from scorching.
Smart Swaps for Every Modern Kitchen
If you're out of traditional ingredients, don't panic. These cookies are surprisingly resilient. You can swap the creamy peanut butter for crunchy if you love a bit of texture, though you may need to press them a bit harder with the fork to get them to stay together. If you're looking for a heartier, darker version, you could even try the base logic used in the Hanky Panky Recipe for a savory sweet snack vibe.
For those looking for a holiday twist, these make a great base for thumbprints. Instead of the fork marks, press your thumb into the center and fill it with a bit of grape jelly or a Hershey’s Kiss after they come out of the oven. If you're making a batch for a special occasion, you might want to see my Valentines Day Heart recipe for more inspiration on shaped treats.
Safe Storage and Freezing Guide Tips
Storage Guidelines: These cookies stay fresh in an airtight container at room temperature for up to 5 days. To keep them extra soft, tuck a small piece of white bread into the container; the cookies will absorb the moisture from the bread.
Freezing Instructions: You can freeze the baked cookies for up to 3 months. However, the real pro move is freezing the raw dough balls. Flash freeze them on a tray for an hour, then toss them into a freezer bag.
When the craving hits, bake them directly from frozen just add 2 minutes to the total baking time.
Zero Waste Tip: If you end up with crumbs at the bottom of the jar, don't throw them away! Pulse them in a blender and use them as a "sand" topping for vanilla ice cream or as a base for a peanut butter cheesecake crust.
Flavor Pairings for Your Ultimate Snack
To truly enjoy these classic peanut butter cookies, you need a drink that cuts through the rich, sticky fat of the nuts. A cold glass of whole milk is the gold standard, but a hot cup of black coffee or a spicy chai tea also works beautifully to highlight the molasses notes in the brown sugar.
If you're serving these at a party, consider a "sweet and salty" platter. Pair the cookies with some sharp cheddar cheese or crisp apple slices. The acidity of the apple balances the heavy peanut butter perfectly.
For a more decadent dessert, crumble a few cookies over a bowl of chocolate mousse the sandy texture provides a brilliant contrast to the velvety cream.
Chef's Tip: If you want a deeper flavor, try browning your butter in a skillet before letting it solidify again. It adds a toasted, toffee like note that makes people ask for your "secret ingredient."
The Physics of the Criss Cross
The traditional fork marks aren't just for looks; they increase the surface area of the dough, allowing heat to penetrate the dense peanut butter center more quickly. This ensures the cookie cooks through before the edges burn.
Scaling Your Batch: To double this recipe, simply 2x all ingredients but keep the salt at 0.75 tsp to avoid over seasoning. If halving the recipe, beat the egg in a small cup and use exactly 2 tablespoons to maintain the correct moisture ratio. For another sweet keto friendly option, check out my Sweet Magic 2026 recipe.
Kitchen Myth: Many people think you must chill the dough for hours. While chilling helps with flavor development, this specific recipe is designed for immediate baking. The ratio of flour to fat is high enough that they won't turn into puddles if you bake them right away.
Cookie Done ness: The biggest mistake is waiting for the cookies to look "done" in the oven. If they look firm and brown while still baking, they will be hard as rocks once they cool. Pull them out when they still look a bit soft and "underdone" in the center trust the carryover cooking!

Recipe FAQs
What are the basic ingredients for peanut butter cookies?
Peanut butter, flour, brown sugar, granulated sugar, butter, egg, baking soda, and vanilla extract. These staples combine to form the classic salty sweet, crumbly texture we expect from this cookie.
What are some common problems with peanut butter cookies?
Excessive spreading and crumbling are most common. Spreading usually means the butter was too warm, causing the fat to melt before the structure sets, while crumbling often points to too much flour or not enough binding agent like the egg.
How to make Snoop Dogg cookies?
Incorporate a small amount of high-quality cannabis edibles or oil into the wet ingredient mixture. Remember to adjust the baking time and temperature slightly, similar to how you manage heat control when preparing the [Banana Pudding Cheesecake Recipe: No Water Bath] base, ensuring even internal
cooking.
What is a three ingredient peanut butter cookie recipe?
Combine 1 cup of peanut butter, 1 cup of sugar, and 1 large egg. Mix these three ingredients thoroughly until just combined, then proceed with the fork pressing and baking at 350°F for 10-12 minutes.
Why do my peanut butter cookies come out hard instead of chewy?
You likely overbaked them or used too much white sugar relative to brown sugar. Brown sugar contains molasses, which retains moisture and promotes chewiness; pull the cookies when the centers still look slightly soft for a better texture.
Is it true that using natural peanut butter ruins the cookie texture?
Yes, natural peanut butter often leads to an oily cookie base. Commercial brands stabilize their fat content, which helps the cookie maintain its shape when heated; natural nut butters separate easily, leading to less structure.
How do I get the distinct criss cross pattern on top of the cookies?
Press the dough balls lightly with a fork in one direction, then turn the fork 90 degrees and press again. This flattening action helps the dense dough spread evenly during baking, a core technique you'll find useful if you enjoy mastering texture control in other baked goods, like our [Red Velvet
Cupcakes with Cream Cheese Frosting for 12].
Classic Peanut Butter Cookies
Ingredients:
Instructions:
Nutrition Facts:
| Calories | 159 kcal |
|---|---|
| Protein | 3.6 g |
| Fat | 9.3 g |
| Carbs | 16.6 g |
| Fiber | 0.7 g |
| Sugar | 9.3 g |
| Sodium | 105 mg |
