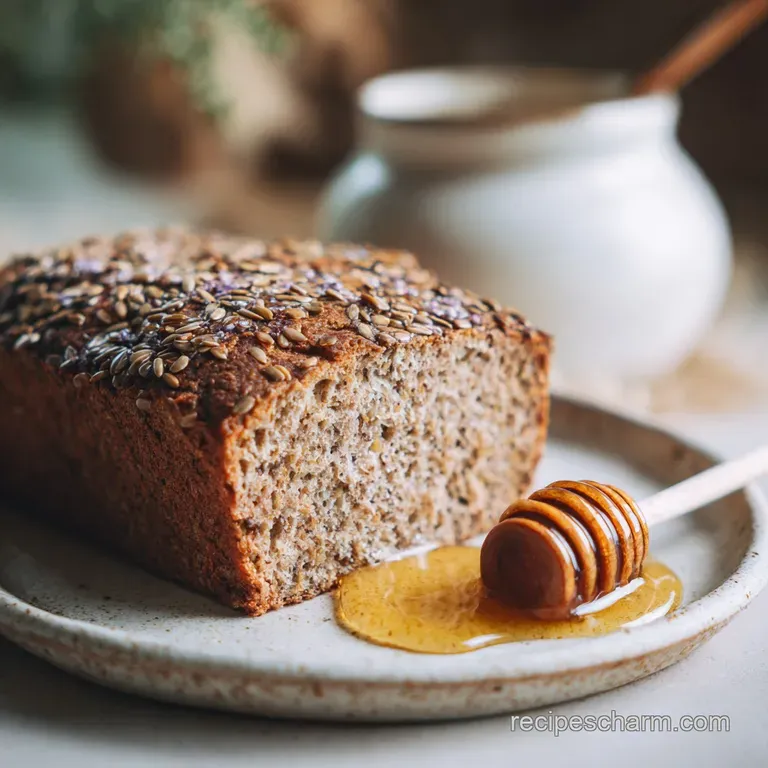
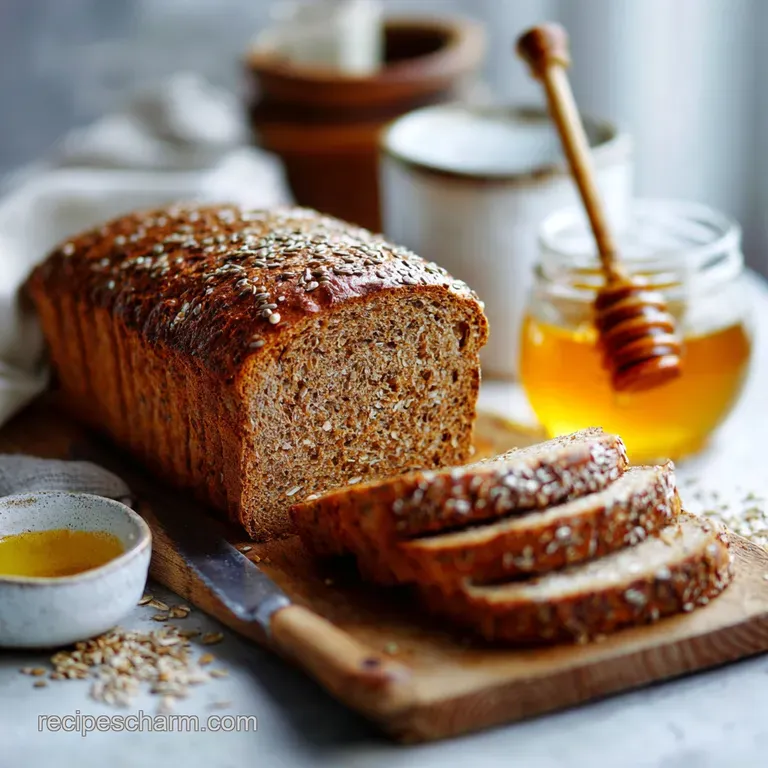
Recipe for Ezekiel Bread with Sprouted Grains and Honey
- Time: Active 1 hours 30 mins, Passive 48 hours 30 mins, Total 50 hours
- Flavor/Texture Hook: Nubby, chewy crumb with a mahogany shatter crisp crust
- Perfect for: High protein breakfast toast or nutritious midday fuel
- The Science Behind Nutrient Dense Results
- Detailed Specs for Your Sprouted Loaf
- Selecting High Quality Grains and Legumes
- Essential Tools for Milling and Baking
- The Multi Day Process for Sprouted Bread
- Solving Common Sprouted Grain Baking Issues
- Variations for Different Diets and Tastes
- Storing Your Loaf to Retain Freshness
- Serving Ideas for Energizing Nutritious Fuel
- Recipe FAQs
- 📝 Recipe Card
The first time I tried to bake this, I treated it like a regular sandwich loaf. Big mistake. I ended up with something that could have doubled as a brick for a patio project. But then, I caught the scent of the grains as they started to sprout a fresh, grassy, earthy aroma that smells like a garden waking up after a spring rain.
That’s when I realized this isn't just baking; it's a slow motion transformation. Bake up a loaf of wholesome goodness with this recipe for Ezekiel Bread with Sprouted Grains and Honey.
Once you see those tiny white "tails" peeking out from the 2.5 cups Hard red wheat berries and the 1.5 cups Spelt berries, you’ll know you’ve unlocked a totally different level of flavor. It's not the flat, one note taste of store-bought flour. It's vibrant. It's energizing.
When that loaf finally hits the oven and the honey starts to caramelize against the proteins in the 2 tbsp Red kidney beans and 2 tbsp Great Northern beans, the smell in your kitchen will be absolutely intoxicating.
We’re skipping the processed shortcuts here because the results are worth every second of that 50 hours. This is the kind of bread that makes you feel fueled and ready to tackle a busy schedule, rather than weighed down by a carb coma.
We've learned the hard way so you don't have to let's get those grains soaking!
The Science Behind Nutrient Dense Results
Enzymatic Activation: Soaking the grains neutralizes phytic acid, which usually acts as a "lock" on nutrients, making minerals like zinc and iron much easier for your body to absorb.
The Physics of the Crumb: Sprouting converts some of the grain's starch into simple sugars, which provides immediate fuel for the 1.5 tbsp Active dry yeast, resulting in a deeper, more complex rise.
| Fresh Sprouted | Flour Shortcut | Flavor Impact | Savings |
|---|---|---|---|
| Home sprouted grains | store-bought sprouted flour | Intense nutty sweetness | Save $5-7 per loaf |
| 48 hour soak/sprout | Direct mix | Grassy, vibrant notes | Better digestion |
| Raw honey (0.5 cup) | White sugar | Floral depth and moisture | Nutrient rich fuel |
This process relies on the biology of the seed. When we add the 4 cups Warm filtered water at exactly 110°F, we are sending a signal to the 0.5 cup Hulled barley and 0.5 cup Millet that it's time to grow. This "waking up" process is what gives the bread its legendary nutritional profile.
Detailed Specs for Your Sprouted Loaf
Understanding the specific role of each legume and grain is the secret to getting that velvety texture inside a rugged exterior. We aren't just using wheat; we are building a complete protein profile by mixing grains with beans like the 0.25 cup Green lentils.
| Ingredient | Science Role | Pro Secret |
|---|---|---|
| Hard Red Wheat (2.5 cups) | Provides structural gluten | Use berries with intact husks for the best sprout rate |
| Raw Honey (0.5 cup) | Natural humectant and yeast fuel | Use local honey to add unique floral layers to the crust |
| Vital Wheat Gluten (1 tsp) | Boosts elasticity in heavy dough | This tiny amount prevents the beans from making the bread too dense |
| Extra Virgin Olive Oil (0.5 cup) | Softens the crumb and preserves freshness | Add it last to the liquid mix to ensure even distribution |
The 1 tsp Vital wheat gluten might seem small, but it's the glue holding our 2 tbsp Great Northern beans and 2 tbsp Red kidney beans in place. Without it, the weight of the legumes would collapse the air pockets created by the yeast, leaving you with a dense center.
Selecting high-quality Grains and Legumes
You’ll need to head to the bulk section or a specialty grocer for this list. Don't worry if you can't find every single grain on the first try; there are ways to keep the balance right.
- 2.5 cups Hard red wheat berries: These are your foundation. Why this? High protein content creates the necessary "stretch" for a high rising loaf.
- Substitute: Hard white wheat berries (creates a milder flavor).
- 1.5 cups Spelt berries: An ancient cousin of wheat. Why this? Adds a distinct sweet, nutty flavor that modern wheat lacks.
- Substitute: Kamut berries (provides a similar buttery texture).
- 0.5 cup Hulled barley: Not pearled barley! Why this? It must be hulled to still be "living" and capable of sprouting.
- Substitute: Oat groats (same chewy texture).
- 0.5 cup Millet: Those tiny yellow beads. Why this? Adds a subtle crunch and a beautiful golden hue to the crumb.
- Substitute: Quinoa (similar size, slightly more bitter).
- 0.25 cup Green lentils: Why this? Essential for the amino acid balance that makes this a complete protein.
- Substitute: Brown lentils (stay away from red, they turn to mush).
- 2 tbsp Great Northern beans: Why this? Creamy texture that disappears into the dough when milled.
- Substitute: Cannellini beans (similar fat and protein content).
- 2 tbsp Red kidney beans: Why this? Adds a earthy depth to the "Ezekiel" flavor profile.
- Substitute: Pinto beans (slightly softer but works well).
- 1.5 tbsp Active dry yeast: Why this? Provides the lift needed for these heavy, sprouted ingredients.
- Substitute: Instant yeast (reduce amount by 25%).
- 1 tbsp Sea salt: Why this? Regulates yeast growth and brings out the honey's sweetness.
- Substitute: Pink Himalayan salt (similar mineral profile).
Chef's Tip: Before you start, do a "float test" on your beans and grains. Put them in a bowl of water; anything that floats to the top is likely dead or hollow and won't sprout. Skim those off and toss them!
Essential Tools for Milling and Baking
You don't need a professional bakery, but a few specific items make this 50 hour journey much smoother. If you don't have a grain mill, a high powered blender (like a Vitamix) can work in short bursts.
- Large Sprouting Jar or Fine Mesh Strainer: To rinse and drain your grains every 8 hours.
- Grain Mill or High Powered Blender: To turn those dried, sprouted grains into fresh flour.
- Digital Scale: This recipe relies on specific ratios; 500g of wheat is more accurate than a "scant" cup.
- Stand Mixer: Your arms will thank you this dough is heavy and sticky.
- 9x5 inch Loaf Pans: You'll need two of these for this yield.
- Instant read Thermometer: To check the water (110°F) and the final bread (190°F).
If you’re feeling like this is a lot of work, remember that once you mill your own sprouted flour, you'll never want to go back to the dusty bags from the store. It's like comparing a fresh garden tomato to a canned one.
If you want to expand your baking skills further, you might also enjoy experimenting with a gluten-free Bread recipe for those days when you need a quicker turn around without the wheat.
The Multi Day Process for Sprouted Bread
This is where the magic happens. We aren't just mixing; we are nurturing life. Follow these steps closely to ensure your grains don't ferment or mold during the sprouting phase.
- Soak the grains. Combine the wheat berries, spelt, barley, millet, lentils, and all beans in a massive bowl with filtered water. Note: Filtered water is key as chlorine can stunted sprout growth.
- Drain and rinse. After 12 hours, drain the water until the liquid runs clear.
- Sprout the mix. Leave the damp grains in a jar or covered bowl in a dark spot for 24-36 hours, rinsing every 8 hours until tiny 1/8 inch white tails appear.
- Dry the sprouts. Spread the sprouted mix on dehydrator trays at 110°F or in an oven at its lowest setting with the door propped until the grains feel rock hard and shatter when pressed.
- Mill the flour. Grind the dried sprouted mix into a fine flour. Note: If using a blender, work in batches to avoid overheating the flour.
- Activate the yeast. Mix the 4 cups Warm filtered water (110°F) with 0.5 cup Raw honey and 1.5 tbsp Active dry yeast. Let it sit 10 mins until a thick, foamy head forms.
- Combine ingredients. Add the 0.5 cup Extra virgin olive oil, 1 tbsp Sea salt, 1 tsp Vital wheat gluten, and your freshly milled flour to the yeast mixture.
- Knead the dough. Use a stand mixer for 8-10 mins until the dough is velvety and pulls away from the sides. It will still be slightly tacky!
- First proof. Place in a greased bowl, cover, and let rise in a warm spot for 60 mins until doubled in size.
- Shape and bake. Divide into two greased 9x5 pans. Let rise another 45 mins, then bake at 350°F for 45 mins until the crust is a deep mahogany and sounds hollow when tapped.
Chef's Tip: Grate a tiny bit of cold butter over the top of the loaf 5 minutes before it finishes baking. It creates a shimmering, silky sheen on the crust that makes it look like it came from a high end bistro.
Solving Common Sprouted Grain Baking Issues
Sprouted bread is a different beast than your standard white loaf. Because the grains have been "pre digested" by enzymes, the dough can sometimes behave unexpectedly. Don't panic; it's usually an easy fix.
Why Your Ezekiel Loaf Stayed Flat
If your bread didn't rise, the most likely culprit is the temperature of the water used for the 1.5 tbsp Active dry yeast. If it's over 120°F, you've accidentally killed the yeast.
If it's under 100°F, the yeast is still "sleeping." Always use a thermometer to hit that 110°F sweet spot. Another reason could be "over sprouting." If the white tails get longer than 1/4 inch, the grain uses up too much of its sugar and starch, leaving nothing for the yeast to eat.
Handling a Sticky Messy Dough
Because of the honey and the moisture in sprouted grains, this dough is notoriously sticky. Resist the urge to keep dumping in extra flour! Over flouring will turn your energizing fuel into a dry, crumbly mess. Instead, oil your hands with a little extra olive oil when shaping the loaves.
This keeps the dough from sticking to you while maintaining the perfect hydration for a velvety crumb.
| Problem | Root Cause | Solution |
|---|---|---|
| Grains smell sour | Fermentation/Bacteria | Rinse more frequently (every 6 hours) during sprouting |
| Crumb is gummy | Underbaked center | Bake until internal temp reaches 190°F on a thermometer |
| Flour is gritty | Coarse milling | Sift the flour and re mill the larger bits; use a high speed setting |
Common Mistakes Checklist:
- ✓ Rinse grains thoroughly every 8-12 hours to prevent bacterial growth.
- ✓ Ensure the grains are 100% dry before milling, or you'll end up with "sprout butter" instead of flour.
- ✓ Proof the dough in a draft free, warm area (the inside of an oven with the light on is perfect).
- ✓ Don't skip the 1 tsp Vital wheat gluten; it provides the structural "muscle" needed for the heavy legumes.
- ✓ Let the bread cool completely (at least 2 hours) before slicing to let the starch set.
Variations for Different Diets and Tastes
While the original recipe for Ezekiel bread with sprouted grains and honey is a classic, you can tweak the "mix" to suit your mood or pantry.
- The Seeded Powerhouse: Add 0.25 cup of sunflower seeds and 2 tbsp of flaxseeds to the dough during the final minutes of kneading. It adds a wonderful "crackle" to every bite.
- Vegan Friendly Version: Swap the 0.5 cup Raw honey for 0.5 cup Grade A maple syrup. Note: This will slightly darken the crumb and add a subtle woody sweetness.
- Savory Herb Loaf: Fold in 1 tbsp of dried rosemary and 1 tsp of garlic powder. This version is incredible when toasted and rubbed with a fresh tomato.
If you are looking for other wholesome options to round out your meal prep, this bread pairs beautifully with a Branzino Fillet Recipe for a light, high protein dinner. The earthy grains balance the delicate, crispy skin of the fish perfectly.
Storing Your Loaf to Retain Freshness
Because this bread lacks the preservatives found in plastic wrapped store loaves, it needs a little extra care to stay fresh and vibrant.
Storage: Keep the loaf in a paper bag at room temperature for up to 3 days. For longer storage, slice the bread first and keep it in an airtight container in the fridge for up to 7 days. The honey acts as a natural preservative, keeping the crumb moist.
Freezing: This bread freezes beautifully! Wrap individual slices in parchment paper and place them in a heavy duty freezer bag. It will stay fresh for up to 3 months. You can pop a slice directly from the freezer into the toaster it will taste just as fresh as the day you baked it.
Zero Waste Tip: If the ends of the loaf get a bit too hard, don't toss them! Pulse them in a food processor to make the most nutrient dense breadcrumbs you've ever had. Use them to top a vegetable gratin or as a binder for turkey meatballs.
Serving Ideas for Energizing Nutritious Fuel
There is nothing quite like a warm slice of this bread. When it’s fresh out of the oven, the crust has a distinct shatter that yields to a chewy, nubby interior.
I love to serve this as the "Ultimate Savory Toast." Smear a thick layer of ripe avocado, a squeeze of lemon, and a sprinkle of red pepper flakes. The density of the grains means one slice is actually filling enough to serve as a complete meal.
For a "Biblical Breakfast," try it toasted with a bit of almond butter and sliced bananas. The honey in the dough echoes the natural sweetness of the fruit.
- 1. Water Temp
- Must be exactly 110°F to wake up the yeast without scalding it.
- 2. Sprout Length
- Aim for 1/8 inch; once they hit 1/4 inch, the flavor starts to become too "green."
- 3. Internal Temp
- The bread is done when a probe thermometer hits 190°F in the thickest part of the loaf.
Trust me, once you’ve mastered the rhythm of the rinse and sprout, this recipe becomes a meditative part of your weekly routine. It’s the ultimate way to turn simple pantry staples into a vibrant, living food that fuels your best days. Happy baking!

Recipe FAQs
What happens if I eat Ezekiel bread every day?
Yes, it is generally a highly nutritious choice. Daily consumption provides consistent, high-quality fiber and a complete protein source due to the mix of grains and legumes.
Is Ezekiel sprouted grain bread good for you?
Yes, it is generally considered very good for you. Sprouting neutralizes phytic acid, dramatically increasing the bioavailability of minerals like iron and zinc, which is a key benefit over unsprouted grains.
What are the potential downsides of Ezekiel bread?
The primary downside is its high preparation time and perishable nature. Because it lacks preservatives and requires 50 hours for preparation, it spoils faster than commercial bread, requiring diligent freezing or refrigeration.
What is the flour mix for Ezekiel bread?
The mix primarily consists of Hard Red Wheat, Spelt, Hulled Barley, and Millet, along with Green Lentils, Great Northern beans, and Kidney beans. This combination creates the complete amino acid profile associated with the classic recipe.
Why is the crumb of my sprouted bread dense and heavy?
This usually happens from insufficient kneading or overcrowding the yeast. You must mix thoroughly to develop the gluten around the heavy beans; if you enjoyed mastering the texture control here, apply the same principle of patience to our Chicken and Peppers recipe when searing for skin crispness.
How do I adjust the recipe if I only have maple syrup instead of honey?
Substitute maple syrup for honey using a 1:1 ratio. Maple syrup provides a similar sweetness and moisture retention, though it will introduce a slightly more woodsy flavor profile to the final loaf.
How long must the grains and beans sprout before milling?
Sprout until a tiny white tail, about 1/8 inch long, emerges from the grain. This usually takes between 24 to 36 hours, depending on your ambient temperature, and signals optimal enzyme activation before drying.
Ezekiel Bread Sprouted Grains

Ingredients:
Instructions:
Nutrition Facts:
| Calories | 220 kcal |
|---|---|
| Protein | 6.7 g |
| Fat | 5.6 g |
| Carbs | 37.9 g |
| Fiber | 4.8 g |
| Sugar | 7.1 g |
| Sodium | 292 mg |
