Tapioca Flour Recipe with Garlic and Herbs
- Time: Active 15 minutes, Passive 20 minutes, Total 35 minutes
- Flavor/Texture Hook: Shatter crisp exterior with a velvety, stretchy cheese center
- Perfect for: Gluten-free snacking, party appetizers, or a hearty side for soup
- Savory Homemade Tapioca Flour Recipe with Garlic and Herbs
- Explaining the Unique Scalding Technique
- Recipe Specifications and Timing
- Deep Dive into Component Analysis
- Essential Pantry Staples and Smart Swaps
- Tools for the Most Consistent Bake
- Step-By-Step Guide to Cheesy Perfection
- Fixing Common Dough Baking Mistakes
- Simple Dietary Adjustments and Flavor Swaps
- Smart Storage and Meal Prep Tips
- Best Ways to Serve Your Bread
- Debunking Common Dough Myths
- Recipe FAQs
- 📝 Recipe Card
Savory Homemade Tapioca Flour Recipe with Garlic and Herbs
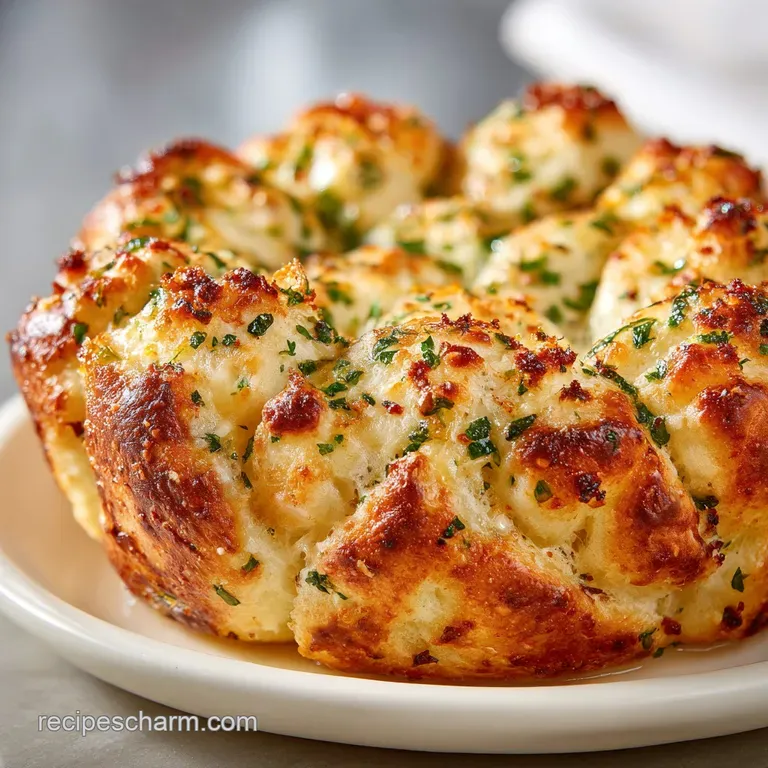
The first time I pulled a tray of these out of the oven, the sizzle of the melting cheese against the baking sheet was music to my ears. I remember the kitchen being filled with the sharp, punchy aroma of roasted garlic and the earthy scent of fresh rosemary.
I’d spent years trying to get that specific Brazilian style chew right, only to end up with hockey pucks or liquid puddles. Discover this unique tapioca flour recipe with garlic and herbs for a savory, delightful dish.
We've all been there, staring at a recipe that looks simple but feels like a chemistry experiment gone wrong. But honestly, once you understand how tapioca starch behaves when it hits heat, it’s a total breeze.
You’re going to love how the sharp white cheddar and parmesan create this salty, umami rich crust that yields to a soft, almost mochi like interior. It is the kind of snack that disappears before it even hits the cooling rack. Trust me, I've had to make double batches just to ensure I get a single bite.
The Physics of the Pull
Starch Gelatinization: When hot milk and oil hit the tapioca flour, the starch granules swell and burst, creating an elastic, stretchy matrix. This unique structure is what allows the bread to puff up and stay chewy without any gluten.
Chef's Tip
Freeze your block of parmesan for 10 minutes before grating; it creates much finer "snow" that melts more evenly into the dough. Also, lightly oil your hands before shaping the balls to prevent the sticky dough from clinging to your fingers.
Explaining the Unique Scalding Technique
The secret to success here is the "scald." You can't just mix everything cold. By boiling the milk and oil together, you’re essentially pre cooking the starch. It feels weird when you first stir it it looks like shaggy, dry clumps but that heat is doing the heavy lifting for the final texture.
If you skip the boil, you'll end up with flat, crunchy crackers instead of puffy clouds.
| Method | Total Time | Texture | Best For |
|---|---|---|---|
| Fast Bake | 35 minutes | Crisp crust, soft core | Last minute guests |
| Classic Rest | 2 hours | Airy, light interior | Maximum volume |
| Air Fryer | 22 minutes | Extra crunchy skin | Small batches |
We usually stick to the fast bake because, let's be real, nobody wants to wait two hours when the garlic smells this good. The sharp white cheddar provides a budget friendly punch of flavor that mimics more expensive aged cheeses without the high price tag.
Recipe Specifications and Timing
For those of you who like to keep things moving in the kitchen, this recipe is a dream. It’s a one bowl situation once the liquid is heated, meaning minimal cleanup for a flavor packed result. We aren't doing any complex proofing or kneading. Just a quick stir, a little rolling, and into the heat they go.
| Servings | Ingredient Adjustments | Pan Size | Cook Time |
|---|---|---|---|
| 11 pieces | Half all ingredients | 9x9 inch sheet | 18 minutes |
| 22 pieces | Use quantities below | 13x18 inch sheet | 20 minutes |
| 44 pieces | Double all ingredients | Two large sheets | 25 minutes |
Keep an eye on the clock during the last few minutes. You want the bottoms to be golden brown, but the tops should remain relatively pale with just a few speckles of toasted cheese. If they stay in too long, the stretchy center will dry out and turn tough.
Deep Dive into Component Analysis
The beauty of this dish lies in how the ingredients interact. Tapioca flour is a fickle friend it's powdery and fine like cornstarch, but it behaves entirely differently under pressure.
Pairing it with the fat from the olive oil and the protein from the eggs creates a stable emulsion that holds air bubbles as the bread bakes.
| Ingredient | Science Role | Pro Secret |
|---|---|---|
| Tapioca Flour | Structural base | Always sift it to avoid tiny, hard starch clumps. |
| Whole Milk | Hydration & browning | Use full fat for the most velvety interior texture. |
| Large Eggs | Leavening agent | Ensure they are room temp to avoid seizing the fats. |
| Olive Oil | Tenderness | Provides a fruity undertone that complements the herbs. |
Essential Pantry Staples and Smart Swaps
Getting the right ingredients is half the battle, but don't panic if your pantry isn't fully stocked. This recipe is surprisingly flexible. While tapioca flour is non negotiable for the texture, the cheese and herbs can be played with based on what's on sale at your local grocer.
- 175ml whole milk: Why this? Provides fat and natural sugars for crust browning. (Swap: Unsweetened oat milk)
- 80ml extra virgin olive oil: Why this? Keeps the crumb moist and adds a savory depth. (Swap: Melted unsalted butter)
- 3 cloves garlic: Why this? Fresh minced garlic offers a sharper bite than powder. (Swap: 1 tsp garlic powder)
- 500g tapioca flour: Why this? The only starch that provides the signature chewy pull. (Swap: No direct sub for texture)
- 2 large eggs: Why this? Binds the dough and helps it rise in the oven. (Swap: 1/4 cup plain Greek yogurt)
- 1 tbsp fresh rosemary: Why this? Adds a piney, aromatic top note to the garlic. (Swap: Fresh thyme or sage)
- 150g parmesan cheese: Why this? Adds the saltiness and structure needed for the crust. (Swap: Aged Asiago or Pecorino)
- 100g sharp white cheddar: Why this? Melts beautifully and adds a tangy, creamy finish. (Swap: Monterey Jack or Gouda)
Tools for the Most Consistent Bake

You don't need fancy gadgets, but a few basics make this much easier. A heavy bottomed saucepan is great for heating the milk because it prevents scorching. I also highly recommend using a silicone baking mat or parchment paper.
Because of the high cheese content, these puffs love to stick to bare metal, and nobody wants to spend their evening scrubbing a tray.
A standard cookie scoop is my secret weapon here. It ensures every ball is the exact same size, which means they all finish cooking at the exact same time. If you’re eyeing the size by hand, you’ll end up with some burnt and some raw. Consistent sizing is the key to that professional, bakery style look.
step-by-step Guide to Cheesy Perfection
- Preheat oven to 400°F (200°C). Note: A hot oven is vital for the initial steam burst.
- Boil 175ml milk, 80ml olive oil, and 1 tsp sea salt in a saucepan.
- Pour the boiling liquid over 500g tapioca flour in a large heat proof bowl.
- Stir with a sturdy wooden spoon until a shaggy, dry dough forms.
- Cool the mixture for 5 minutes so you don't scramble the eggs.
- Mix in the 3 minced garlic cloves, 1 tbsp rosemary, and 1 tsp dried oregano.
- Incorporate 2 eggs one at a time, beating well after each addition. Note: The dough will look broken at first but will come together.
- Fold in 150g parmesan and 100g sharp white cheddar until evenly distributed.
- Scoop 22 portions onto a lined tray, leaving 2 inches of space between them.
- Bake for 20 minutes until the bottoms are golden and tops are puffed.
Fixing Common Dough Baking Mistakes
One thing I've learned the hard way: don't add the eggs while the flour mixture is still piping hot. I did that once and ended up with bits of cooked egg white throughout my bread. It still tasted okay, but the texture was totally off.
If your dough feels way too sticky to handle, even with oiled hands, it might just need a few more minutes to sit and hydrate.
Why Your Bread Stays Flat
If your puffs aren't rising, it usually comes down to the temperature of the liquid. If the milk and oil aren't at a rolling boil when they hit the flour, the starch doesn't gelatinize properly. This means there's no "balloon" to hold the steam, so the bread stays dense.
| Problem | Root Cause | Solution |
|---|---|---|
| Puffs are oily | Liquid wasn't hot enough | Ensure milk/oil reach a rolling boil before mixing. |
| Hard as a rock | Overbaked or too much flour | Reduce bake time by 2 mins; measure flour by weight. |
| Dough is too runny | Eggs were too large | Add 1 tbsp extra tapioca flour at a time until tacky. |
Adding these to your routine will save you a lot of headache. Most mistakes happen in the first five minutes of mixing.
- ✓ Use a kitchen scale for the 500g of tapioca flour to ensure accuracy.
- ✓ Ensure the milk and oil mixture is bubbling before pouring it over the starch.
- ✓ Let the dough rest for at least 5 minutes before adding the cheese.
- ✓ Don't open the oven door for the first 15 minutes of baking.
- ✓ Grate your own cheese rather than using the pre shredded bagged stuff.
Simple Dietary Adjustments and Flavor Swaps
If you're looking for a bit of a kick, you can easily turn this into a spicy Indian inspired version. Just swap the rosemary for some cumin seeds and finely chopped green chilies. It’s a fantastic variation that pairs beautifully with a cooling yogurt dip. For another quick flavor boost, you might even try serving these alongside a Chicken and Peppers recipe for a full, balanced meal.
Vegan and Spice Tweaks
For a dairy-free version, use full fat coconut milk and nutritional yeast instead of parmesan. You won't get the exact same "pull," but the flavor is remarkably close. If you're a fan of bold flavors, try adding a pinch of smoked paprika or even some red pepper flakes into the dough.
It cuts through the richness of the cheese perfectly.
Smart Storage and Meal Prep Tips
These are best eaten warm, right out of the oven. However, life happens and you might have leftovers. Store them in an airtight container at room temperature for up to 2 days, or in the fridge for up to 5 days. To get that "shatter" back on the crust, avoid the microwave it'll turn them into rubber.
Instead, pop them in a toaster oven or air fryer at 350°F for 3-4 minutes.
You can also freeze the raw dough balls! Just scoop them onto a tray, freeze until solid, and then toss them into a freezer bag. They’ll keep for 3 months. When you're ready for a snack, bake them straight from frozen, just add about 5 extra minutes to the cook time. It's the ultimate hack for effortless hosting.
Best Ways to Serve Your Bread
These savory puffs are incredibly versatile. I love serving them in a big basket in the middle of the table. They are substantial enough to be a snack on their own, but they also act as a great "mop" for sauces. If you're looking for a fun party spread, pair them with a Pinch Me Recipe for an extra hit of garlic that guests will love.
If you’re doing a cozy night in, try them with a side of marinara or a herbed garlic butter. But honestly? My favorite way to eat them is just plain, standing over the kitchen counter while they're still steaming hot.
There's something so satisfying about that first bite where the cheese is still stretchy and the herbs are at their most fragrant.
Deciding on Your Flavor Profile
- If you want more umami, add a teaspoon of miso paste to the boiling milk.
- If you want it extra crispy, brush the tops with a little extra olive oil halfway through baking.
- If you want a softer roll, replace 50ml of the milk with heavy cream.
Debunking Common Dough Myths
One huge myth is that you can substitute all purpose flour for tapioca flour. You absolutely cannot. Wheat flour relies on gluten, while this recipe relies on starch gelatinization. If you switch them, you’re making a standard dinner roll, not a chewy cheese puff.
The two are entirely different animals in the kitchen world.
Another misconception is that the "scalded" dough is ruined if it looks lumpy. Those lumps actually disappear once you add the eggs and cheese. Don't over work the dough trying to make it smooth before the eggs go in, or you'll lose the airiness.
The messy, shaggy stage is just a natural part of the process embrace it! Finally, searing or browning the garlic before adding it isn't necessary; the high heat of the oven will cook the garlic perfectly inside the dough balls.

Recipe FAQs
What else can I make with tapioca flour?
Yes, many gluten-free alternatives. Tapioca flour provides superior chewiness, similar to the texture achieved when baking our gluten-free Carrot recipe, though it cannot be substituted 1:1 with wheat flour.
Is tapioca flour healthier than regular flour?
No, not inherently. Tapioca flour is pure starch, offering carbohydrates but lacking fiber and significant nutrients found in whole grain flours; it is mainly useful for texture in gluten-free cooking.
What is Pão de Queijo made of?
Pão de Queijo primarily uses tapioca flour, eggs, cheese, and milk/oil. This recipe shares the same core structural component tapioca starch scalded with hot liquid which creates that signature stretchy interior.
What is tapioca flour best for?
Achieving chewy, elastic, and crispy textures without gluten. It excels in recipes where you need binding strength and that unique, slightly bouncy chew, like in savory puffs or thickeners.
How do I make sure my dough isn't too sticky before rolling?
Lightly oil your hands with olive oil before handling the dough. If the dough remains unmanageable after the initial cooling, add one extra tablespoon of tapioca flour and quickly knead it in.
Can I use dried herbs instead of fresh rosemary?
Yes, use a smaller amount of dried herbs. Dried herbs are more concentrated, so start by substituting the 1 tablespoon of fresh rosemary with 1 teaspoon of dried rosemary.
Why do my puffs look flat after baking?
The liquid mixture was likely not hot enough when added to the flour. If you master the sensory cues of heat transfer here, you can apply the same principle to ensure proper steam activation when trying our Steamed Rice Recipe for tender results.
Garlic Herb Tapioca Puffs

Ingredients:
Instructions:
Nutrition Facts:
| Calories | 171 kcal |
|---|---|
| Protein | 4.4 g |
| Fat | 7.5 g |
| Carbs | 20.9 g |
| Fiber | 0.1 g |
| Sugar | 0.4 g |
| Sodium | 244 mg |
