Chocolate Covered Strawberries: Professional Gloss
- Time: Active 45 minutes, Passive 30 minutes, Total 1 hours 15 mins
- Flavor/Texture Hook: Silky chocolate shell with a crisp, refreshing fruit burst
- Perfect for: Aesthetic gifting, viral worthy dessert platters, and romantic celebrations
- Master the Ultimate Chocolate Covered Strawberries
- The Physics of the Snap
- Selecting Your Luxury Ingredients
- Essential Professional Dipping Tools
- Executing the Dipping Ritual
- Troubleshooting Your Berry Designs
- Artistic Variations for Visual Impact
- Storage and Freshness Tactics
- Curating the Aesthetic Presentation
- Scaling for Larger Gatherings
- Debunking Berry Coating Myths
- Recipe FAQs
- 📝 Recipe Card
Master the Ultimate Chocolate Covered Strawberries
Close your eyes and listen. That distinct, sharp "crack" when your teeth meet a chilled chocolate shell is the ultimate sensory reward. I remember the first time I tried making these for a friend’s gallery opening. I thought I could just melt some chips, dip some berries, and call it a day.
Instead, I ended up with a tray of "weeping" strawberries sitting in a puddle of muddy chocolate that refused to set. It was a disaster, but it taught me everything about what actually works for that viral worthy finish.
The secret isn't just in the chocolate; it's in the preparation of the fruit and the precise science of the coating. We are aiming for a look that is polished, glossy, and undeniably stunning.
Whether you are putting together a Valentine Chocolate Covered Strawberries Set or just want to treat yourself to something beautiful, the details matter. We want that velvety smooth texture without the grainy, dull finish of overheated cocoa.
In this guide, I am demystifying the process so you can skip the trial and error. We'll talk about how to get that "foot free" look and how to use color balance to make your tray pop.
It's about more than just taste; it's about the aesthetic experience of a perfectly executed Chocolate Covered Strawberries recipe that feels special enough for a high end gift box.
The Physics of the Snap
Crystal Stability: Tempering chocolate aligns the cocoa butter molecules into "Type V" crystals, which provides that signature glossy sheen and firm snap at room temperature. Without this alignment, the chocolate remains soft, dull, and prone to melting the moment a finger touches it.
Surface Tension Management: Adding refined coconut oil to the chocolate reduces its viscosity, allowing it to flow more smoothly over the berry's curves. This results in a thinner, more elegant shell that shatters rather than crumbles when bitten.
| Method | Time | Texture | Best For |
|---|---|---|---|
| Microwave | 5 minutes | Smooth & easy | Beginners wanting a quick, clean look |
| Double Boiler | 15 minutes | Professional gloss | Large batches needing stable heat |
| Instant Pot | 10 minutes | Consistent melt | Hands off melting on "Keep Warm" setting |
Getting the temperature right is the difference between a dull brown coating and a shimmering masterpiece. If you've ever mastered the precision needed for a Red Velvet Cupcakes recipe, you know that chemistry is your best friend in the kitchen. When working with your Covered Strawberries Set, keeping the chocolate between 88°F and 90°F is the sweet spot for dark chocolate.
For the Perfect Snap
The "seeding method" is our best tool here. By stirring in unmelted chocolate chunks into your warm, melted chocolate, you "seed" the mixture with those stable crystals we talked about. This forces the entire bowl to adopt that stable structure.
It's the most reliable way to ensure your Chocolate Covered Strawberries don't turn into a sticky mess the second they leave the fridge.
Selecting Your Luxury Ingredients
For a truly stunning result, we need to talk about the quality of what goes into the bowl. I always reach for couverture chocolate. Unlike standard chocolate chips, which contain stabilizers that prevent them from melting smoothly, couverture has a higher percentage of cocoa butter.
This is what gives us that high fashion, glossy finish that looks so viral worthy on camera.
- 2 lbs fresh long stemmed strawberries: Why this? Long stems act as a natural handle for dipping and look more sophisticated.
- 12 oz high-quality dark or milk couverture chocolate (60% cocoa): Why this? High cocoa butter content ensures a superior, silky melt and snap.
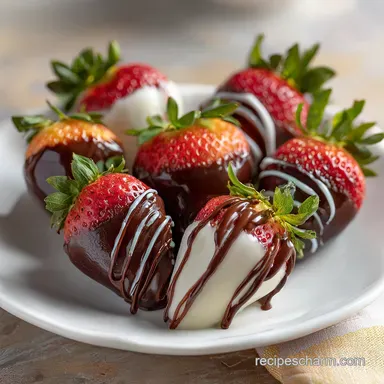
- 4 oz white chocolate: Why this? Provides the essential bright contrast for professional looking drizzles and patterns.
- 2 tsp refined coconut oil: Why this? thins the chocolate slightly for a delicate, even coating without altering flavor.
- 1 tsp freeze dried raspberry dust (optional): Why this? Adds a vibrant red pop and a concentrated punch of tart flavor.
- 1 tbsp crushed toasted hazelnuts (optional): Why this? Introduces an earthy texture and gold brown tones for color balance.
| Ingredient | Science Role | Pro Secret |
|---|---|---|
| Dark Chocolate | Structural base | Use 60% cacao for the best balance of flow and firmness |
| Coconut Oil | Viscosity agent | Ensure it is refined so the strawberry flavor remains the star |
| Strawberries | Moisture source | Any water on the surface will cause chocolate to "seize" and clump |
When selecting your berries, look for ones that are uniform in size. Huge berries are impressive, but medium sized ones are much easier to eat in one or two bites, which prevents the chocolate from shattering all over your lap.
Essential Professional Dipping Tools
You don't need a professional laboratory, but a few specific items make the "presentation" much easier to achieve. A heavy bottomed glass bowl is my favorite for melting because it retains heat well, keeping your chocolate in the "working zone" longer.
If the chocolate cools down too fast, it gets thick and lumpy, and you lose that sleek, thin coating we are after.
I also swear by parchment paper rather than wax paper. The silicone coating on parchment allows the chocolate to release effortlessly. If you want that viral worthy "no foot" look, where there isn't a big puddle of chocolate at the bottom of the berry, the surface you set them on matters just as much as the dip itself.
Chef's Note: Freeze your baking sheet for 10 minutes before you start dipping. When the warm chocolate hits the cold sheet, it sets instantly at the base, preventing the "puddling" effect that creates those ugly flat feet.
Executing the Dipping Ritual
1. The Dehydration Phase
Wash your 2 lbs of strawberries at least 2 hours before you plan to dip them. This is the most important step. Use a paper towel to pat each one dry, then let them air dry on a wire rack. Even a single microscopic drop of water can cause your 12 oz of chocolate to seize into a grainy, unworkable paste.
2. Precision Melting
Place 8 oz of your dark chocolate and 1 tsp of coconut oil in a microwave safe bowl. Heat in 30 second bursts, stirring vigorously between each. Once it is mostly melted, add the remaining 4 oz of solid chocolate. Stir until completely smooth. This "seeding" cools the chocolate and builds the right crystal structure.
3. The Dipping Ritual
Hold the strawberry by the stem or the green leaves. Pull the leaves back gently. Submerge the berry into the chocolate, stopping just before the greens. Lift it straight up and let the excess drip off. Give it a gentle swirl to break the "tail" of chocolate that forms at the tip.
4. The Decorative Flourish
Place the berry onto your chilled, parchment lined tray. If you are using the crushed hazelnuts, sprinkle them on immediately while the chocolate is wet. If you are using the white chocolate drizzle, wait 10 minutes for the base to set.
This ensures your lines stay crisp and don't bleed into the dark base.
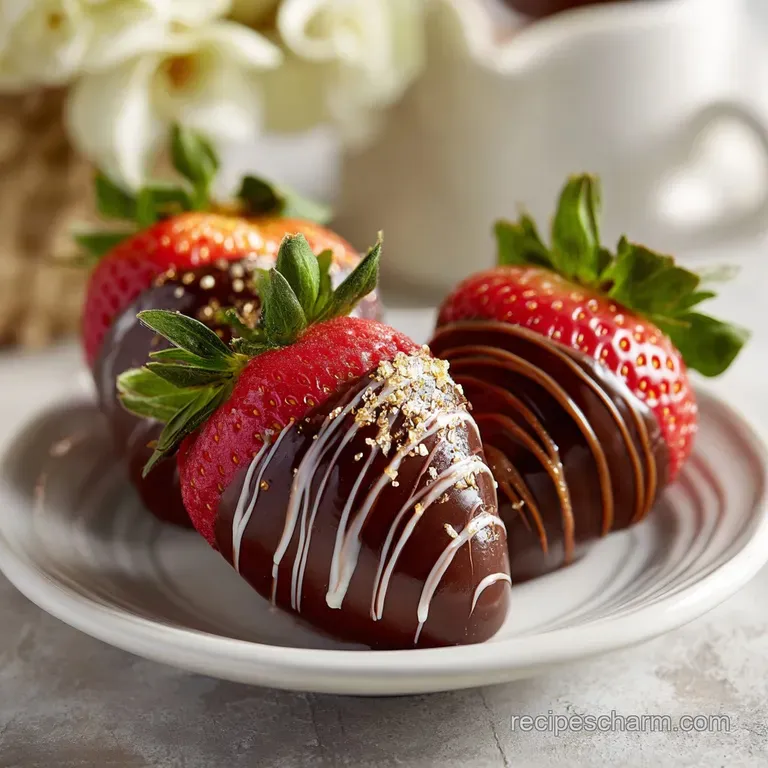
5. Achieving Color Balance
- 1. Red Accent
- Sprinkle the raspberry dust on 1/3 of the berries while tacky.
- 2. Gold/Earthy Accent
- Use the hazelnuts on another 1/3.
- 3. Contrast Accent
- Use the 4 oz of melted white chocolate to create thin, diagonal stripes across the final 1/3.
6. The Setting Stage
Let the berries sit at room temperature for 15 minutes before moving them to the fridge for another 15 minutes. Cold air helps the cocoa butter lock into place, giving you that brilliant shine.
Don't rush this; if you move them to the fridge too fast, they can develop "bloom," which are those white streaks that ruin the look.
7. The Final Touch
Once set, use a small paring knife to trim any tiny bits of chocolate that might have run off the sides. This gives you a clean, boutique style finish. For an extra pop, you can even lightly brush the stems with a tiny bit of olive oil to make the greens look vibrant and fresh.
Troubleshooting Your Berry Designs

One of the most common heartbreaks is when your beautiful Chocolate Covered Strawberries start to "sweat." This usually happens because of a temperature shock. When you move a cold berry into a warm room, moisture from the air condenses on the cold surface. It’s not the chocolate's fault; it's just physics!
Why Your Chocolate Is Grainy
If your chocolate looks thick, dull, or chunky, you likely overheated it. Chocolate is delicate; once it goes above 115°F, the proteins can scorch. If this happens, you can sometimes save it by adding another teaspoon of coconut oil and stirring frantically, but usually, it's a sign to start fresh with lower heat.
| Problem | Root Cause | Solution |
|---|---|---|
| Chocolate is clumpy | Water contamination | Keep all tools bone dry; avoid steam from pots |
| Shell is sliding off | Berries were too cold | Let fruit reach room temperature before dipping |
| White streaks (Bloom) | Poor tempering/Heat shock | Use the seeding method; cool at room temp first |
Stopping the "Sweat" Beads
To prevent the dreaded weeping, don't store your berries in an airtight container. The berries "breathe," and in a sealed box, that moisture has nowhere to go but onto the chocolate shell. A cardboard box with a piece of paper towel at the bottom is the gold standard for keeping them dry.
Common Mistakes Checklist:
- ✓ Never dip a cold strawberry; the chocolate will set too fast and crack later.
- ✓ Ensure the stems are completely dry; water hides under those little green leaves.
- ✓ Don't use a deep bowl for a small amount of chocolate; you need enough depth to submerge.
- ✓ Avoid cheap "compound" chocolate if you want a true, snappy shell.
- ✓ Don't skip the coconut oil; it provides that viral worthy thin coating.
Artistic Variations for Visual Impact
If you want to go beyond the classic look, think about the "presentation" as a canvas. You can create a "Manly" gift set by using exclusively dark chocolate and topping them with crushed pretzels or a pinch of flaky sea salt. The salt creates a beautiful crystalline shimmer that looks stunning against the dark cocoa.
For a vegan friendly version, ensure your dark chocolate is dairy-free and swap the white chocolate drizzle for a melted cocoa butter and powdered sugar mix. The "The Vegan Romance Swap" doesn't have to sacrifice style.
You can still achieve that high gloss finish by being extra diligent with your tempering temperatures.
- The Tuxedo Look: Dip half the berry in white chocolate, let it set, then dip the sides in dark chocolate to create a "jacket" effect.
- The Galaxy Berry: Add a tiny drop of food grade luster dust to your white chocolate drizzle for a shimmering, viral worthy effect.
- The Ombré Set: Mix varying amounts of dark and white chocolate to create a gradient of shades from deep mahogany to cream.
Storage and Freshness Tactics
Chocolate Covered Strawberries are at their absolute peak within 12 hours of being made. Because the strawberry is a living fruit trapped inside a sugar shell, it will eventually start to release juice. This is what causes the "weeping" effect.
If you need to make them ahead of time, aim for no more than 24 hours.
Storage: Keep them in a cool, dry place. If your kitchen is hot, use the fridge but place them in a cardboard bakery box lined with paper towels. The cardboard and towels will absorb any excess moisture, keeping the shells crisp.
Zero Waste: If you have leftover melted chocolate, don't toss it! Spread it out on a piece of parchment, sprinkle with any leftover hazelnuts or raspberry dust, and let it set. You've just made a quick chocolate bark that tastes just as good as the berries.
You can also use the strawberry tops (the green parts) to infuse water or vinegar for a subtle fruity note.
Curating the Aesthetic Presentation
Presentation is everything when it comes to a gift set. If you are making these for a Valentine Chocolate Covered Strawberries Set, use a box with dividers. This prevents the berries from bumping into each other and scuffing that beautiful glossy finish.
Nestle each berry in a mini cupcake liner; it looks professional and makes them easier to pick up without getting fingerprints on the chocolate.
For a truly viral worthy platter, pair your Covered Strawberries with other textures. I love placing them next to a Strawberry Rose Recipe to show off different ways to prep the fruit. The contrast between the matte, carved fruit and the high gloss chocolate is a visual feast.
- If you want a matte finish, skip the tempering and use a high-quality cocoa powder dusting over the wet chocolate.
- If you want a metallic look, use a dry brush to apply edible gold leaf once the chocolate is fully set.
- If you want a rustic vibe, leave the long stems messy and pile them on a wooden board with fresh mint leaves.
Scaling for Larger Gatherings
When you are making these for a crowd, the logistics shift. Instead of dipping one-by-one, set up a "dipping station." You'll want to work in batches of 10. Melt your 12 oz of chocolate in a smaller, deeper bowl so you maintain depth as the level drops.
- Scaling Up (2x-4x): If you are doing 50+ berries, use a slow cooker on the "warm" setting as a makeshift double boiler to keep the chocolate fluid. Only increase your spices or toppings by 1.5x, as they go further than you think.
- Scaling Down (1/2): For a small romantic evening, you can melt just 6 oz of chocolate in a very small ramekin. This ensures you still have enough depth to dip the berries fully without wasting a huge bowl of chocolate.
Working in batches prevents the chocolate from cooling too much while you are decorating. If you are adding toppings like hazelnuts, have a helper sprinkle them while you dip. This ensures every berry gets its garnish while the chocolate is at its stickiest.
Debunking Berry Coating Myths
Many people believe that adding water to thick chocolate will thin it out. This is a dangerous myth! Adding even a drop of water to melted chocolate causes it to seize instantly. The sugars and cocoa solids bind together, turning your silky liquid into a gritty, hard lump.
Always use an oil based fat, like coconut oil or cocoa butter, to thin your coating.
Another misconception is that you should freeze the strawberries before dipping to make the chocolate set faster. While it does set the chocolate quickly, it also causes the berry to expand and then contract as it thaws.
This movement will cause the chocolate shell to crack and shatter, and the temperature difference will guarantee a massive "sweating" problem within minutes of taking them out of the freezer.
Searing or "sealing" the strawberry isn't a thing either. The chocolate doesn't create an airtight seal; it's a porous coating. The best way to "seal" in the freshness is simply to leave the green tops on. They act as a natural plug, keeping the juices inside the berry where they belong. Trust the process, keep things dry, and you'll have a stunning Covered Strawberries Set that looks like it belongs in a professional boutique. For more gift ideas, check out our Love Bug Oreo recipe.

Recipe FAQs
Can I substitute cocoa butter for the coconut oil to thin the chocolate?
Yes, but use less. Cocoa butter is much firmer than coconut oil at room temperature, so you should start with half the amount recommended for oil to achieve a similar viscosity.
How to make the chocolate set with a hard, glossy snap without specialized equipment?
Temper using the seeding method. Melt 75% of your chocolate gently, remove from heat, and then stir in the remaining 25% unmelted chocolate until it melts completely; this aligns the crystals for a professional finish.
Why do my coated strawberries develop "sweating" within an hour of setting?
This is usually caused by temperature shock or high humidity storage. Move berries from the fridge to a cool, dry room temperature area first, and avoid airtight containers that trap moisture released by the fruit.
Is it true that using frozen strawberries prevents the chocolate from sticking properly?
Yes, always use fresh, dry berries. Freezing causes ice crystals to form inside the berry, which turn into surface moisture upon thawing, instantly causing the chocolate coating to seize or develop bloom.
How to apply fine stripes of white chocolate for a decorative drizzle effect?
Use a small piping bag fitted with a very small round tip, or a parchment cone. Wait until the base dark chocolate is nearly set tacky but not hard so the drizzle sits cleanly on top rather than sinking into the base layer.
Do I need to remove the leaves (calyx) before dipping the strawberry?
No, keep the leaves intact if possible. The leaves serve as a natural handle, allowing you to dip deep into the chocolate without touching the actual fruit, which maintains a cleaner aesthetic.
Can I use regular baking chocolate chips instead of couverture for better texture control?
No, stick to couverture chocolate for the best results. Baking chips contain stabilizers designed to hold their shape, resulting in a duller, thicker coating that crumbles rather than snaps, unlike the high-quality fats in couverture.
Gourmet Valentine Chocolate Strawberries
Ingredients:
Instructions:
Nutrition Facts:
| Calories | 126 kcal |
|---|---|
| Protein | 1.6 g |
| Fat | 8.1 g |
| Carbs | 12.2 g |
| Fiber | 1.9 g |
| Sugar | 8.1 g |
| Sodium | 5 mg |
