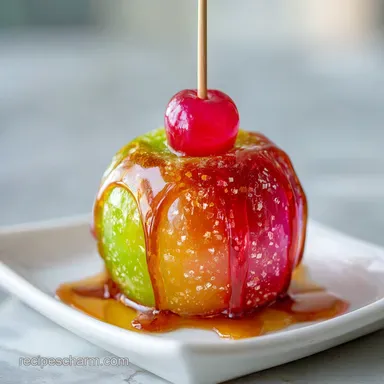
Glow in the Dark Jolly Rancher Candy Apple with Savory Splash
- Time: Active 20 minutes, Passive 15 minutes, Total 35 minutes
- Flavor/Texture Hook: Glass like neon shatter with a velvety, spicy balsamic finish
- Perfect for: High end Halloween parties, viral social media content, and avant garde dessert nights
- Making the Glow in the Dark Jolly Rancher Candy Apple with Savory Splash
- The Logic Behind This Viral Glowing Treat
- Component Analysis: Ingredient Deep Dive
- Selecting High Impact Components for Neon Shine
- Essential Tools for Creating Glassy Candy Coatings
- Executing the Flawless High Shine Dipping Technique
- Solving Surface Bubbles and Sticky Sugar Issues
- Exploring Flavor Swaps and Modern Ingredient Adaptations
- Protecting the Crisp Crunch During Extended Storage
- Three Plating Levels for Social Media Success
- Recipe FAQs
- 📝 Recipe Card
Making the Glow in the Dark Jolly Rancher Candy Apple with Savory Splash
I remember the first time I tried making these for a late night shoot in my kitchen. The room was pitch black, lit only by a cheap UV torch I’d taped to the side of my range hood, casting a moody purple hue over the counter.
When that first Granny Smith dipped into the bubbling neon syrup, it didn't just look like food it looked like something stolen from a sci fi set. The way the green glow pulsated under the blacklight made my heart skip; it was the ultimate Instagram worthy moment before I even took the photo.
But the real magic happened when I drizzled that dark, moody balsamic glaze over the glowing shell. That sharp, savory splash cutting through the intense sweetness of the Jolly Ranchers was a complete revelation. Most people expect candy apples to be a one note sugar bomb, but this version is different.
It’s a sensory shatter of tart apple, citrusy candy, and a spicy, umami kick that keeps you coming back for another bite. Honestly, once you’ve seen these glowing on a platter, standard red candy apples just feel a bit dull.
We’ve all seen those "Pinterest fails" where the candy is a sticky mess or the glow is non existent. Trust me, I’ve been there, scraping burnt sugar off my favorite saucepan at midnight.
That’s why I’ve refined this process to ensure your coating is as smooth as glass and your glow is bright enough to light up the room. We aren't just making a snack; we're creating a piece of edible art that defies expectations.
The Logic Behind This Viral Glowing Treat
The Physics of Fluorescent Sugar: Riboflavin (Vitamin B2) molecules absorb invisible UV light and re emit it at a lower energy level, creating a visible neon green glow within the sugar matrix.
This fluorescence remains stable as long as the 100mg Vitamin B2 riboflavin powder is thoroughly suspended in the transparent Jolly Rancher coating.
Chemical Interference for Clarity: The 120ml light corn syrup acts as an "interfering agent," preventing the 400g granulated sugar from recrystallizing into a grainy mess. This ensures the final shell is translucent enough for the internal glow to penetrate through the candy layer.
| Cook Method | Time | Texture Result | Visual Impact |
|---|---|---|---|
| Stovetop (Heavy Pot) | 15 minutes | Crystal clear, glass like shatter | Maximum gloss and shine |
| Microwave (Glass Bowl) | 8 minutes | Can be slightly cloudy | Good for small batches |
| Oven (Double Boiler) | 25 minutes | Softest crunch, very stable | Best for large party prep |
Using a heavy bottomed pot on the stovetop is my go to because it gives you the most control over the "Hard Crack" stage. When you're working with high temperatures, precision is everything to avoid that dreaded burnt sugar smell.
Component Analysis: Ingredient Deep Dive
| Ingredient | Science Role | Pro Secret |
|---|---|---|
| 15 Jolly Rancher Candies | Flavor & Acid Profile | Grind into a powder first to melt them faster without scorching the sugar. |
| 100mg Vitamin B2 Powder | Fluorescent Base | A tiny bit goes a long way; too much can add a slightly bitter, vitamin like aftertaste. |
| 120ml Light Corn Syrup | Crystallization Inhibitor | Keep the bottle at room temperature so it pours easily and measures accurately. |
| 60ml Balsamic Glaze | Savory Counterpoint | Use a thick, pre reduced glaze so it clings to the glassy surface instead of sliding off. |
The choice of Granny Smith apples is vital here because their high acidity and firm flesh provide a structural backbone that won't turn to mush under the 300°F heat of the syrup. Plus, that green skin peeking through the neon coating just adds to the aesthetic.
Selecting High Impact Components for Neon Shine
To get that viral worthy finish, you need more than just sugar and fruit. Every element in this Glow in the Dark Jolly Rancher Candy Apple with Savory Splash serves a dual purpose: visual drama and flavor balance.
- 6 Large Granny Smith Apples: These provide the tart "crunch" that balances the sugar. Why this? Firmness prevents the apple from collapsing under over high heat candy coatings.
- 400g Granulated Sugar: The structural base of your candy shell. Why this? Cleanest flavor profile for taking on Jolly Rancher notes.
- 120ml Light Corn Syrup: Essential for a smooth, non grainy finish. Why this? Prevents sugar crystals from bonding together too tightly.
- 120ml Filtered Water: Dissolves the sugar evenly. Why this? Filtered water avoids mineral deposits that can cloud the candy.
- 15 Jolly Rancher Hard Candies: These provide the neon color and concentrated fruit flavor. Why this? Green apple or lemon flavors work best for the glow.
- 100mg Vitamin B2 Riboflavin Powder: This is your secret "glow" ingredient. Why this? It's food safe and reacts intensely to blacklight.
- 0.5 tsp Neon Food Coloring: Boosts the daytime color. Why this? Ensures the apples look vibrant even without the UV light.
- 60ml Balsamic Glaze: The "savory splash" that elevates the dish. Why this? Adds a velvety, acidic depth to the sweet shell.
- 1 tsp Flaky Smoked Sea Salt: For texture and umami. Why this? The flakes catch the light and add a satisfying salt "pop".
- 0.125 tsp Cayenne Pepper: For a subtle, lingering heat. Why this? Cuts through the sugar and pairs beautifully with balsamic.
Chef's Tip: Freeze your wooden dowels or sticks for 20 minutes before inserting them into the apples. The cold wood helps the candy set faster at the base, preventing that "puddle" effect at the bottom of the apple.
Essential Tools for Creating Glassy Candy Coatings

Don't even think about starting this without a reliable candy thermometer. I once tried to "eyeball" the hard crack stage by dropping syrup into cold water, and let's just say I ended up with apples that felt like chewing on taffy. Not the vibe we're going for!
You want a shatter that sounds like breaking glass when you bite into it.
A heavy duty saucepan is also non negotiable. Thin pots create hot spots that will burn your 400g of sugar before it ever reaches the right temp. If you have a silicone baking mat (like a Silpat), use it.
The apples won't stick, and you can easily peel off any neon "drips" to snack on later which, let's be honest, is the best part of being the cook.
If you’re looking for more ways to use high-quality fruit in stunning ways, you might enjoy my Chocolate Covered Strawberries recipe, which uses similar dipping techniques but with a much lower temperature profile.
Executing the Flawless High Shine Dipping Technique
Stripping the Wax Barrier
Wash your 6 Granny Smith apples in very hot water mixed with a splash of cider vinegar. Use a fresh abrasive sponge to scrub the skins. This removes the food grade wax that manufacturers apply, which is the number one reason candy shells slide right off the apple. Dry them until they are bone dry.
Calibrating the Sugar Matrix
Combine 400g sugar, 120ml corn syrup, and 120ml water in your heavy pot. Stir over medium heat until the sugar granules completely disappear. Once it starts bubbling, stop stirring immediately. If you stir after it boils, you'll introduce air bubbles that will ruin your smooth, viral worthy finish.
Infusing the Glow and Flavor
Attach your thermometer and cook until the mixture hits 290°F. At this point, quickly stir in your crushed 15 Jolly Ranchers, 100mg Vitamin B2, and 0.5 tsp neon food coloring. The temperature will drop slightly, then climb again.
Continue cooking until the thermometer reads exactly 300°F. This is the "Hard Crack" stage.
Executing the Perfect Dip
Remove from heat and let the bubbles settle for about 30 seconds. Tilt your pot to one side to create a deep pool of neon syrup. Holding an apple by the stick, dip and swirl it quickly until the skin is fully encased in green glass.
Lift it out, let the excess drip off for a few seconds, and place it on your silicone mat.
Applying the Savory Splash
While the candy is still slightly tacky (about 2 minutes after dipping), whisk your 60ml balsamic glaze with 0.125 tsp cayenne pepper. Use a spoon to create artistic drips or a "splash" effect over the top of the apple.
Immediately sprinkle the 1 tsp flaky smoked sea salt over the wet glaze so it sticks.
Solving Surface Bubbles and Sticky Sugar Issues
Why Your Candy Apple is Sticky
If your Glow in the Dark Jolly Rancher Candy Apple with Savory Splash feels tacky or sticks to your teeth, the sugar didn't reach a high enough temperature. This usually happens if your thermometer is touching the bottom of the pot rather than being suspended in the liquid.
If the sugar only hits 280°F, it stays in the "soft crack" stage, which is great for taffy but terrible for candy apples.
Dealing with Tiny Surface Bubbles
Bubbles are usually caused by either residual moisture on the apple skin or stirring the syrup too vigorously once it has reached a boil. If you see bubbles forming as you dip, try popping them gently with a toothpick while the candy is still hot.
Also, ensure your apples are at room temperature; cold apples can cause "heat shock," leading to a bumpy surface.
| Problem | Root Cause | Solution |
|---|---|---|
| Candy Shell Slides Off | Wax coating remained on the apple | Scrub apples with hot water and vinegar before starting. |
| Cloudy Appearance | Impurities in the water or over stirring | Use filtered water and avoid stirring once the boil begins. |
| Balsamic Glaze Runs Off | Glaze is too thin or candy is too cold | Reduce the balsamic further or apply while candy is still slightly warm. |
Common Mistakes Checklist
- ✓ Never skip the wax removal step; it's the difference between a professional look and a mess.
- ✓ Ensure your candy thermometer is calibrated by testing it in boiling water (should read 212°F/100°C).
- ✓ Don't overcrowd the pot; work with one apple at a time for a consistent coating.
- ✓ Let the syrup bubbles subside before dipping to ensure a mirror like finish.
- ✓ Store the finished apples in a cool, dry place; humidity is the enemy of hard candy.
Exploring Flavor Swaps and Modern Ingredient Adaptations
If you want to move away from the "Green Apple" vibe, you can easily swap the Jolly Rancher flavors. Blue Raspberry Jolly Ranchers combined with the Vitamin B2 will create a haunting "Electric Teal" glow that looks incredible under blacklight.
For a more sophisticated twist, try using a white balsamic reduction instead of the traditional dark one it keeps the neon colors looking cleaner while still providing that savory punch.
| Original Ingredient | Substitute | Why It Works |
|---|---|---|
| Light Corn Syrup | Brown Rice Syrup | Similar glucose structure. Note: Adds a slight toasted flavor and amber tint. |
| Vitamin B2 Powder | Tonic Water (Concentrated) | Quinine glows blue under UV. Note: Requires reducing the water content in the recipe. |
| Cayenne Pepper | Gochugaru (Korean Chili) | Adds a smoky, fruity heat. Note: Larger flakes may change the texture of the splash. |
If you're planning a full spread of treats, these apples pair wonderfully with other textured desserts. For a softer contrast, think about serving a slice of my Banana Pudding Cheesecake Recipe on the side the creamy texture is the perfect foil to the candy's sharp shatter.
Protecting the Crisp Crunch During Extended Storage
Storage: These apples are best enjoyed within 24 hours. Because sugar is hygroscopic (it pulls moisture from the air), the candy shell will eventually start to soften and "weep." Keep them in a cool, dry place, but avoid the refrigerator if possible.
The humidity in most fridges will turn your glassy masterpiece into a sticky mess in hours. If you must refrigerate, place them in an airtight container with a small desiccant pack.
Zero Waste: Don't throw away that leftover neon syrup! Pour it out onto a silicone mat and let it harden. Once cool, shatter it into "neon glass" shards. These make stunning toppers for cupcakes or can be crushed and used as a glowing rim for cocktails at your next party.
The leftover balsamic glaze is also fantastic drizzled over roasted Brussels sprouts or a simple caprese salad the next day.
Three Plating Levels for Social Media Success
| Level | Plating Focus | Aesthetic Key |
|---|---|---|
| Simple | Party Ready | High contrast white platter under a UV spotlight. |
| Polished | Gift Boxed | Individual clear boxes with a sprinkle of "neon dust" (crushed candy) at the base. |
| Restaurant | The "Nebula" | A dark slate board with a balsamic smear and a "smoke" effect using dry ice nearby. |
The "Nebula" Plating Style
To truly demystify that high end look, place the Glow in the Dark Jolly Rancher Candy Apple with Savory Splash in the center of a matte black plate. Use a squeeze bottle to create a spiral of the spicy balsamic glaze around the base.
Sprinkle the smoked sea salt specifically on the balsamic lines to create "stars" in your edible galaxy. When the blacklight hits the apple, the glowing green core will reflect off the dark glaze, creating a stunning visual depth that looks like a deep space nebula.
The "Spicy Nebula" Twist
For those who want even more drama, you can infuse the apple itself. Before dipping, use a sterile flavor injector to put a tiny drop of the balsamic and cayenne mixture directly into the core of the apple. When your guests bite through the neon shatter, they get an unexpected burst of savory heat from the inside out.
It's a total game changer for anyone who thinks they've seen it all when it comes to fairground treats.
Keeping the Glow Alive
Remember that the glow is only visible under UV light. If you're serving these at a party, make sure you have a dedicated "Glow Station" with a few blacklight bulbs. Without the UV, they will still look like stunning, vibrant neon apples, but that eerie, radioactive looking glow is what really makes them viral worthy.
I’ve found that even a small handheld UV flashlight can create a great "reveal" moment for your guests as you serve them.
Right then, you're all set to create the most talked about dessert of the season. Just remember to watch that thermometer like a hawk, and don't be afraid to get messy with that savory splash. It’s supposed to look a bit wild!
Trust me, the first time you hear that perfect shatter as someone takes a bite, you'll know all the effort was worth it. Let's crack on and get those apples glowing!

Recipe FAQs
What Jolly Rancher flavors are discontinued?
It varies by region and time, but key ones include Raspberry Lime and Green Apple/Cherry combinations. While this recipe relies on the Green Apple flavor for the best glow, specific seasonal mixes are retired frequently by the manufacturer.
Are there any candies that glow in the dark besides those with Vitamin B2?
Yes, but they require different chemical bases. Tonic water contains quinine, which glows blue under UV light, and some synthetic food dyes fluoresce; however, for a stable, edible green glow in a hard candy shell, Riboflavin (Vitamin B2) is the most reliable ingredient.
Is Tanghulu the same as a candy apple?
No, Tanghulu is distinct, though related in technique. Tanghulu typically involves skewering various fruits (often winter berries) and dipping them in a thin, clear sugar syrup, creating a delicate, crisp shell, whereas a standard candy apple uses a thicker, often colored coating for a more substantial
crunch.
Can you buy just green apple Jolly Ranchers?
Yes, look for bulk or single flavor bags. Sometimes they are sold seasonally or in specialized candy shops, although they are most commonly found in assortment bags; if you are struggling to find them, utilizing the technique of flavor extraction seen in my Umami Mushroom Seasoning recipe, we focus on extracting pure flavor notes.
How do I prevent the candy coating from sliding off the apple?
Scrub the apple skin vigorously with hot water and vinegar. Manufacturers apply a thin, food grade wax layer to apples to preserve shelf life, which prevents the syrup from adhering properly; this scrubbing removes that barrier entirely.
How do I achieve the perfect savory splash texture with the balsamic glaze?
Reduce the balsamic vinegar until it coats the back of a spoon thickly. If the glaze is too watery, it will run off the hard candy shell immediately; if you are struggling with precise liquid reductions, remember the principle of solvent removal is key, similar to how we intensify flavor in the Spicy Chili Recipe with Fork Tender Beef.
What is the ideal temperature for the hard crack stage?
Pull the syrup immediately at exactly 300°F (149°C). This temperature ensures maximum sugar crystallization for that glass like shatter; anything below 290°F will result in a sticky, taffy like texture that defeats the purpose of the brittle shell.
Neon Savory Candy Apples
Ingredients:
Instructions:
Nutrition Facts:
| Calories | 522 kcal |
|---|---|
| Protein | 0.8 g |
| Fat | 0.4 g |
| Carbs | 131 g |
| Fiber | 4.2 g |
| Sugar | 106 g |
| Sodium | 428 mg |
