Swifties Bake It off Taylor Swift Cupcakes
- Time: Active 25 mins, Passive 20 mins, Total 45 mins
- Flavor/Texture Hook: Silky vanilla bean crumb with a buttery, high shine finish
- Perfect for: Era's tour watch parties, themed birthdays, and viral worthy dessert tables
- Swifties Bake it Off Taylor Swift Style
- The Architecture of the Rise
- Component Analysis for Perfection
- Essentials for the Eras Look
- Tools Every Swiftie Needs
- Baking Your Way Through Eras
- Solving Common Era Baking Blunders
- Creative Swaps for Your Tour
- Debunking Era Baking Folklore
- Keeping Every Bite "Long Live"
- Serving Your Eras Tour Masterpiece
- Recipe FAQs
- 📝 Recipe Card
Swifties Bake it Off Taylor Swift Style
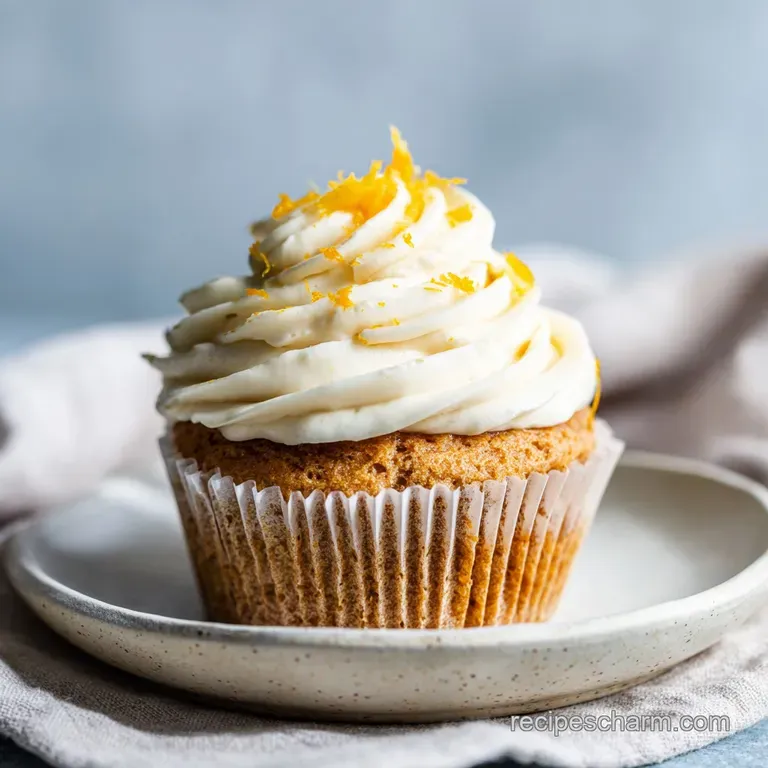
The scent of premium vanilla bean paste hitting creamed butter is like the first chord of "All Too Well" - it instantly stops you in your tracks and promises something legendary. Get ready to wow your guests with this unforgettable Taylor Swift cupcake recipe, complete with dreamy vanilla frosting, perfect for your Era's party.
I remember the first time I tested this batch; I was trying to recreate the "Lover" aesthetic with soft pinks and blues, but the cupcakes kept sinking because I was rushing the process.
This recipe is the result of those messy kitchen floor moments, refined into a foolproof method that ensures your treats look just as stunning as a front row seat at the tour. We aren't just making cake here; we're building a base that can hold the weight of edible glitter, star sprinkles, and all the memories of your favorite eras.
Whether you are leaning into the "Reputation" dark cocoa vibes or the "Speak Now" purples, this vanilla foundation is your blank space to write any flavor story you want.
Expect a crumb that is tight enough to hold its shape but soft enough to melt the moment it hits your tongue. We’ve moved past the dry, crumbly grocery store versions and stepped into a world of professional grade textures that stay moist even after hours on a display.
It is about the ritual of the bake, the sizzle of the oven, and that final "shatter" of glitter over the frosting that makes the whole room shimmer.
The Architecture of the Rise
The Physics of the Fluff: Room temperature butter and sugar create a mechanical leavening system where jagged sugar crystals carve tiny air pockets into the fat, which the baking powder then expands.
This specific hydration ratio of 120ml whole milk to 190g flour ensures the gluten remains supple rather than tough.
| Method | Prep Time | Final Texture | Best For |
|---|---|---|---|
| Fresh Scratch | 25 mins | Velvety, tight crumb | High end Era's parties |
| Box Shortcut | 5 mins | Airy, sponge like | Last minute watch parties |
| Bakery Style | 40 mins | Dense, pound cake | Tiered cupcake towers |
Choosing the scratch method is always my recommendation for these Swifties Bake it. While a box mix is fast, it lacks the structural integrity needed to support the heavy "Long Live" vanilla frosting we're piling on top.
The scratch version uses 113g of real butter which provides a richness that vegetable oil based mixes simply cannot replicate.
Component Analysis for Perfection
| Ingredient | Science Role | Pro Secret |
|---|---|---|
| Vanilla Bean Paste | Flavor Depth | Contains seeds that provide a visual "gourmet" speckle |
| Whole Milk | Hydration & Fat | The 3.5% fat content tenderizes the crumb better than skim |
| Baking Powder | Leavening | Ensure it is under 6 months old for a 20% better rise |
| Clear Vanilla | Color Control | Keeps the frosting stark white for better dye vibrancy |
Essentials for the Eras Look
To master the Swifties Bake it Off Taylor Swift look, you need ingredients that offer both stability and flavor. We are using 1.5 cups (190g) of all purpose flour as our structural base. It provides the perfect amount of protein to prevent the cupcakes from collapsing under the weight of the decor.
- 1.5 cups (190g) all purpose flour: Why this? Provides enough structure to hold heavy frosting peaks.Substitute: 1:1 gluten-free flour blend.
- 1 cup (200g) granulated sugar: Why this? Essential for the creaming process and moisture retention.Substitute: Caster sugar for a finer crumb.
- 1.5 tsp baking powder: Why this? The primary lift agent for that domed top.Substitute: 0.5 tsp baking soda + 1 tsp cream of tartar.
- 0.5 tsp salt: Why this? Sharpens the sweetness and balances the butter.Substitute: Fine sea salt.
- 0.5 cup (113g) unsalted butter: Why this? Room temp butter emulsifies perfectly with the sugar.Substitute: Vegan butter sticks (not tub).
- 1 large egg: Why this? Binds the fats and liquids for a smooth batter.Substitute: 1/4 cup unsweetened applesauce.
- 0.5 cup (120ml) whole milk: Why this? Adds the necessary liquid for starch gelatinization.Substitute: Oat milk for a nutty undertone.
- 1.5 tsp vanilla bean paste: Why this? Delivers concentrated flavor and beautiful dark specks.Substitute: Double the amount of vanilla extract.
- 1 cup (226g) unsalted butter (for frosting): Why this? The high fat content ensures the frosting holds its shape.Substitute: high-quality shortening for heat resistance.
- 3.5 cups (420g) powdered sugar: Why this? Sifted sugar creates a grit free, velvety finish.Substitute: Organic powdered sugar (though it may be slightly beige).
- 2 tbsp (30ml) heavy cream: Why this? Adjusts the consistency to "pipable" perfection.Substitute: Full fat coconut milk.
- 1 tsp clear vanilla extract: Why this? Keeps the frosting "White Horse" pure for dyeing.Substitute: Natural vanilla extract (will tint it cream).
Tools Every Swiftie Needs
For a truly Instagram worthy result, the equipment is just as vital as the ingredients. You'll want a stand mixer like a KitchenAid to get the butter and sugar fluffy enough. If you try to do this by hand, you won't incorporate enough air, and you'll end up with dense discs instead of light cakes.
A standard 12 cup muffin tin is the requirement here. If you're looking for more aesthetic bakes, my Banana Pudding Cheesecake Recipe is another viral worthy showstopper that uses similar high fat principles. You also need a piping bag with a large star tip (1M or 2D) to get those signature swirls that look like they belong on a tour poster.
Chef's Tip: Freeze your metal whisk attachment for 10 minutes before starting the frosting. The cold metal helps keep the butter from over softening as you whip, resulting in a much more stable peak.
Baking Your Way Through Eras

Phase 1: The Master Batch Prep
Preheat your oven to 180°C and line your tin with parchment liners. Ensure your 113g of butter is soft enough that your finger leaves an indent, but not so soft that it is greasy.
Cream the butter and 200g of sugar on medium high for 4 minutes until the mixture is pale and doubled in volume.
Phase 2: Building the Structure
Add the egg and vanilla bean paste, beating for another minute until fully combined. In a separate bowl, whisk your 190g of flour, baking powder, and salt. Alternate adding the dry ingredients and the 120ml of milk, beginning and ending with the flour. Mix only until no white streaks remain.
Note: Overmixing at this stage will activate the gluten and make your cupcakes tough.
Phase 3: The Eras Tour Decoration
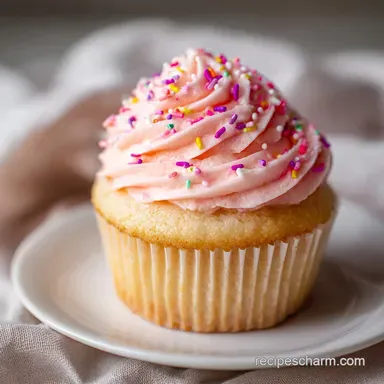
Fill each liner 2/3 full. Bake for 18 to 20 minutes until the tops spring back when lightly touched. While they cool, beat the remaining 226g of butter for 5 minutes. Slowly add the 420g of powdered sugar, then the cream and clear vanilla.
Whip on high for 2 minutes until it looks like a fluffy cloud. Divide the frosting and add your gel colors to match your favorite era.
Solving Common Era Baking Blunders
Why Your Cupcakes Sunken
If your cupcakes look like they have a crater in the middle, it is usually because the oven door was opened too early. The sudden drop in temperature causes the delicate air bubbles to collapse before the structure has set. Another culprit is expired baking powder; if it can't hold the rise, gravity wins every time.
For Gritty or Grainy Frosting
Nothing ruins the vibe like "crunchy" frosting. This happens when the powdered sugar isn't sifted or if the butter wasn't beaten long enough before adding the sugar. If you've already made it and it feels grainy, add a teaspoon of heavy cream and whip it on high for another 3 minutes.
| Problem | Root Cause | Solution |
|---|---|---|
| Greasy Tops | Butter too warm | Chill the batter for 10 mins before baking |
| Dry Crumb | Overbaked | Check internal temp; pull at 98°C |
| Frosting Melting | Cupcakes still warm | Wait 1 full hour before piping |
Common Mistakes Checklist
- ✓ Use room temperature eggs to avoid curdling the batter.
- ✓ Sift your powdered sugar twice for a truly velvety finish.
- ✓ Don't overcrowd the oven; bake one tray at a time in the center rack.
- ✓ Use gel food coloring instead of liquid to keep the frosting stiff.
- ✓ Let the cupcakes cool on a wire rack, not in the hot pan.
Creative Swaps for Your Tour
For those hosting a tea party vibe, this recipe pairs beautifully with a and Tasty Spring recipe as part of a larger dessert spread. You can easily adapt the flavor profile of the base by adding citrus zest for a "1989" seaside feel or a touch of cinnamon for a "Red" autumn vibe.
For a Secret "Red" Center
Core the center of your cooled cupcakes and fill them with a bright red raspberry jam or a strawberry reduction. It adds a "revelation" of flavor when your guests bite in, and it's an easy way to incorporate more Era specific themes without changing the entire recipe.
| Servings | Butter | Flour | Cook Time |
|---|---|---|---|
| 6 People | 56g | 95g | 16-18 mins |
| 12 People | 113g | 190g | 18-20 mins |
| 24 People | 226g | 380g | 22-25 mins |
When scaling up to 24 people, remember to work in batches. Most home ovens can't handle the airflow required for two full trays of cupcakes without creating hot spots. If you must bake two trays, rotate them halfway through the timer to ensure an even bake.
Debunking Era Baking Folklore
One common myth is that you must use cake flour for a soft cupcake. In reality, all purpose flour provides the necessary strength to support the "Off Taylor Swift" decorations we're using.
Cake flour often results in a cupcake that is too fragile to handle, crumbling the moment you try to peel back the liner at a party.
Another misconception is that the "toothpick test" is the gold standard for doneness. While helpful, it can be misleading. A cupcake can be dry and overbaked even if the toothpick comes out clean. The real test is the "bounce back" or using a digital thermometer to hit exactly 98°C.
This ensures the center is set but the moisture is still locked inside the crumb.
Keeping Every Bite "Long Live"
Storage is the secret to a stress free party. These cupcakes can be baked 2 days in advance and stored in an airtight container at room temperature. If you've already frosted them, keep them in the fridge if your kitchen is warm, but bring them back to room temperature for 30 minutes before serving.
Cold butter frosting has the texture of a candle, which isn't what we're going for!
For zero waste, take any leftover frosting and sandwich it between two graham crackers or use it as a dip for fruit. If you have cupcake scraps from coring the centers, crumble them up and mix them into vanilla ice cream for a "homemade" cake batter treat.
These little scraps are the "invisible string" that ties your kitchen together.
Serving Your Eras Tour Masterpiece
The presentation is where the "Swifties Bake it" magic really happens. Use a tiered stand to create height and group your cupcakes by color to represent different albums. I love using a mix of matte and holographic liners to catch the light, much like the sequins on a tour outfit.
The "Eras Tour" Display
Place a small card in front of each grouping. Use gold edible glitter for "Fearless", dark purple sprinkles for "Speak Now", and maybe some dried lavender for "Midnights". The key is in the details; a single star sprinkle on top of a perfectly piped swirl makes these look like they came from a high end boutique bakery.
The Ultimate Pairing
These cupcakes are sweet, so they pair perfectly with a sharp, cold glass of champagne or a tart lemon mocktail. If you are serving them at a daytime brunch, a strong iced latte with a dash of vanilla syrup complements the vanilla bean paste in the cake beautifully.
Whatever you choose, make sure it is served cold to contrast with the rich, room temperature butter of the frosting.

Recipe FAQs
Can I substitute the vanilla bean paste with extract for a cleaner look?
No, you should use the paste or whole bean. The specks from the paste provide the signature gourmet look for this recipe; extract offers only flavor without the visual element.
What is the critical step to ensure the vanilla frosting remains stiff for tall piping?
Whip the butter alone for at least five full minutes before adding sugar. This creates the maximum amount of air pockets, leading to a stable emulsion that resists melting or collapsing under heat.
How to tell if the cupcakes are perfectly baked without opening the oven door too early?
Wait until the 18-minute mark, then look for the edges to just start pulling away from the liner. If you enjoyed mastering precise doneness cues here, apply the same sensory evaluation to our Kodiak Pancakes Recipe for perfect fluffiness.
Is it necessary to use room temperature butter for both the cake and the frosting?
Yes, using room temperature butter is crucial for both components. Cold butter prevents proper creaming, leading to dense cake, while overly soft butter makes frosting soupy.
How to scale this recipe up significantly for a very large party without the middle sinking?
Bake in smaller batches across multiple racks, rotating halfway through. Do not try to bake two full trays at once, as crowding suffocates the air circulation needed for an even rise.
Why is the recipe calling for clear vanilla extract in the frosting instead of standard brown extract?
Clear vanilla is used specifically to maintain a stark white color. Standard extract contains coloring agents that will tint your frosting beige, ruining the vibrant dye potential for themed designs.
Can I make the cake base ahead of time and store it before decorating?
Yes, bake the bases up to 24 hours in advance. Store them tightly wrapped at room temperature, ensuring they are completely cooled before attempting to frost them, similar to how you would prepare a base for the Amish Friendship Bread recipe.
Swifties Bake It Off Cupcakes
Ingredients:
Instructions:
Nutrition Facts:
| Calories | 481 kcal |
|---|---|
| Protein | 2.8 g |
| Fat | 24.7 g |
| Carbs | 64.3 g |
| Fiber | 0.5 g |
| Sugar | 52.1 g |
| Sodium | 185 mg |
