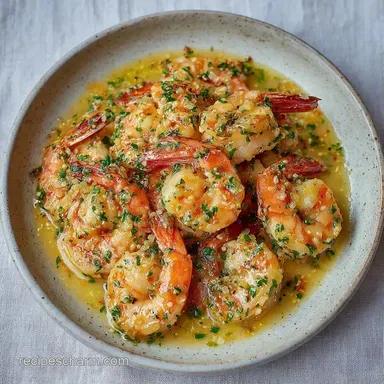
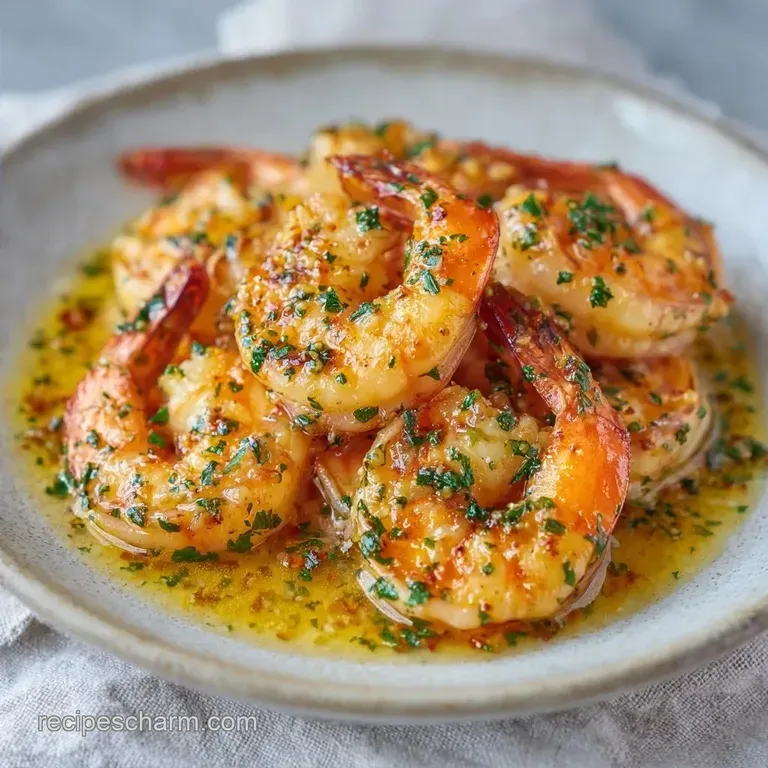
Easy Garlic Shrimp: Pan-Seared and Tender
- Time: 5 min active + 10 min cooking
- Flavor/Texture Hook: Velvety garlic butter with a golden brown sear
- Perfect for: Weeknight family dinner or a quick appetizer
- The Sizzle of Easy Garlic Shrimp
- Why This One Pan Meal Works
- The Breakdown of Every Component
- Smart Swaps for Your Budget
- Tools for a Better Sear
- Step by Step Cooking Guide
- Solving Common Shrimp Problems
- Ways to Tweak the Flavor
- Storing and Saving Your Shrimp
- Plating Your Meal with Style
- Recipe FAQs
- 📝 Recipe Card
Ever wonder why some shrimp taste like they came from a high end bistro while others feel like chewing on a rubber band? I remember the first time I tried this for my family. I was so eager to get that garlic flavor in there that I threw the garlic in at the same time as the shrimp.
By the time the shrimp were pink, the garlic was burnt, bitter, and smelled like a campfire. It was a disaster, and my husband just politely chewed through the charred bits.
That mistake taught me that timing is everything in the pan. The sizzle of the butter hitting the hot metal is the signal to start, but the garlic is a delicate guest that arrives late to the party. When you get the sequence right, you get a dish that feels fancy but takes almost no effort.
This Easy Garlic Shrimp is now my go to when I have exactly 15 minutes to get food on the table.
You can expect a meal that's punchy, bright, and incredibly hearty. We're focusing on budget friendly jumbo shrimp and a few pantry staples to create a sauce that's velvety and rich. It's the kind of meal that makes the house smell like a professional kitchen without the stress of a complicated recipe.
The Sizzle of Easy Garlic Shrimp
The real magic here is in the sear. I've found that using a stainless steel or cast iron skillet is the only way to get that golden crust. If you use a non stick pan, you'll miss out on those little browned bits at the bottom, which are essentially flavor gold.
When the shrimp hit the oil and butter, you want to hear a loud, aggressive sizzle. That's the sound of water leaving the surface and the crust forming.
One thing that surprised me early on was the difference between fresh and frozen shrimp. Honestly, don't even bother hunting for "fresh" shrimp at the counter, as they're often previously frozen anyway.
Buying a large bag of frozen jumbo shrimp is way easier on the wallet and usually just as good, provided you thaw them properly. Just make sure they're completely dry before they touch the pan.
This dish is a lifesaver for those nights when you're exhausted but want something that feels like a treat. It's a one pan wonder, meaning cleanup is a breeze. You just have one skillet to wash and a couple of bowls. It's the definition of a high reward, low effort meal.
Why This One Pan Meal Works
There's a reason this method produces a better result than just tossing everything in a pot. It's all about managing the heat and the ingredients.
- Surface Dryness: Removing moisture from the shrimp prevents them from steaming. This allows them to sear and brown quickly instead of boiling in their own juices.
- Fat Blending: Using both butter and olive oil prevents the butter from burning. The oil raises the smoke point, allowing the butter to provide flavor without turning black.
- Sequential Cooking: Searing the shrimp first and removing them prevents overcooking. This ensures the garlic stays fragrant and golden, not bitter.
- Pan Deglazing: Adding lemon juice at the end lifts the caramelized proteins from the pan. This incorporates all those deep flavors back into the sauce.
| Method | Time | Texture | Best For |
|---|---|---|---|
| Fast Sear | 15 mins | Firm & Crusty | Weeknights |
| Classic Poach | 25 mins | Soft & Tender | Fancy Platters |
| Slow Sauté | 20 mins | Buttery & Soft | Pasta Bases |
The Breakdown of Every Component
The ingredients here are simple, but each one has a specific job to do. If you're watching your budget, remember that you can often find great deals on jumbo shrimp in the freezer aisle.
| Ingredient | Science Role | Pro Secret |
|---|---|---|
| Jumbo Shrimp | Protein Base | Pat dry with paper towels for a better crust |
| Unsalted Butter | Flavor & Fat | Divide it to prevent burning the garlic |
| Garlic | Aromatics | Mince finely to maximize surface area |
| Lemon Juice | Acid/Balance | Deglazes the pan to capture browned bits |
Smart Swaps for Your Budget
I love a recipe that doesn't force you to run to three different stores. Most of this is likely in your pantry already. If you're missing something, these substitutions will still give you a great result.
- 1 lb jumbo shrimp, peeled and deveined Why this? Great size for searing without overcooking
- Substitute: Medium shrimp (reduce cook time by 1 minute per side)
- 2 tbsp unsalted butter, divided Why this? Adds richness and a velvety finish
- Substitute: Ghee or salted butter (reduce added salt)
- 1 tbsp extra virgin olive oil Why this? Increases smoke point of the butter
- Substitute: Avocado oil or canola oil
- 4 cloves garlic, minced Why this? The primary flavor driver
- Substitute: 1 tsp garlic powder (Note: adds less depth)
- 1 tbsp fresh lemon juice Why this? Cuts through the fat of the butter
- Substitute: White wine or apple cider vinegar
- 1/2 tsp sea salt Why this? Enhances all other flavors
- Substitute: Kosher salt
- 1/4 tsp black pepper Why this? Adds a subtle heat
- Substitute: White pepper for a milder taste
- 2 tbsp fresh parsley, chopped Why this? Adds freshness and color
- Substitute: Dried parsley (use 1 tsp)
| Original Ingredient | Substitute | Why It Works |
|---|---|---|
| Butter (2 tbsp) | Vegan Butter | Similar fat profile. Note: Check for salt content |
| Lemon Juice (1 tbsp) | Dry White Wine | Similar acidity. Note: More complex, "restaurant" taste |
| Fresh Parsley | Fresh Cilantro | Bright herbal note. Note: Shifts flavor toward a Tex Mex vibe |
If you're looking for a way to turn this into a more substantial dinner, you can serve this over a bed of rice or pasta. If you happen to have some leftovers, you can use the remaining sauce as a base for my Garlic Shrimp Sauce to dress up some steamed veggies.
Tools for a Better Sear

You don't need a fancy kitchen to make this, but the right pan makes a huge difference. I always reach for my 12 inch stainless steel skillet. It distributes heat evenly and allows for that beautiful browning that non stick pans just can't replicate.
A good fish spatula or silicone tongs are also essential. You want to be able to flip the shrimp quickly without tearing the delicate meat. Since we're working with high heat, a long handled tool keeps your hands away from the splatter.
Finally,, have a bowl of warm water nearby to rinse your garlic cloves if you're peeling them by hand. It makes the process much faster. Trust me, once you start using a large skillet, you'll never go back to those small fry pans for seafood.
Step by step Cooking Guide
Let's crack on with the actual cooking. Follow these steps closely, and you'll have a restaurant quality meal in no time.
- Thaw the shrimp and pat them completely dry with paper towels. Note: Moisture creates steam, which stops the searing process.
- Season the shrimp lightly with sea salt and black pepper in a mixing bowl.
- Heat 1 tbsp of butter and the olive oil in a 12 inch skillet over medium high heat until the butter foams and sizzles.
- Add the shrimp in a single layer. Note: Don't crowd the pan or the temperature will drop.
- Sear for 2 minutes without moving them until they are golden brown on the bottom.
- Flip and sear for another 1-2 minutes until they just turn opaque and curl into a "C" shape.
- Remove shrimp from the pan immediately and set them on a plate. Note: This prevents them from turning into rubber.
- Lower the heat to medium. Add the remaining 1 tbsp of butter and minced garlic.
- Sauté for 30-60 seconds until the garlic is fragrant and pale gold.
- Stir in the lemon juice to deglaze the pan, scraping up the browned bits. Return the shrimp to the skillet, toss to coat in the velvety sauce, and garnish with chopped fresh parsley.
Chef's Tip: To get an even more intense flavor, try grating your garlic with a microplane instead of chopping it. This releases more oils and ensures the garlic melts into the butter sauce rather than staying in chunks.
Solving Common Shrimp Problems
Even with a simple recipe, things can go sideways. The most common issue is overcooking. Shrimp cook incredibly fast, and the difference between "tender" and "rubbery" is about 60 seconds. If you're unsure, take them out a little early; they will continue to cook for a minute from the residual heat.
Another issue is the garlic. If your pan is too hot when you add the garlic, it will burn in seconds. This creates a bitter taste that ruins the whole batch of Easy Garlic Shrimp. Always lower your heat before the garlic hits the pan.
| Problem | Root Cause | Solution |
|---|---|---|
| Rubbery Texture | Overcooked | Remove from heat as soon as they form a "C" shape |
| Bitter Taste | Burnt Garlic | Lower heat to medium before adding garlic |
| No Brown Crust | Shrimp too wet | Pat dry with paper towels before seasoning |
Common Mistakes Checklist
- ✓ Did you pat the shrimp dry?
- ✓ Did you wait for the butter to foam before adding shrimp?
- ✓ Did you remove the shrimp before adding the garlic?
- ✓ Is the garlic pale gold and not dark brown?
- ✓ Did you deglaze the pan with lemon juice?
If you find yourself struggling with the searing process, you can check out some professional techniques on Serious Eats to see how heat management works for proteins. Once you master the sear, you can apply it to other dishes, like my Stuffed Peppers for a different kind of hearty family dinner.
Ways to Tweak the Flavor
This Easy Garlic Shrimp recipe is a great base, but you can easily change the vibe depending on what's in your fridge. If you want something with more kick, add a pinch of red pepper flakes when you add the garlic. It gives the sauce a lovely warmth without being overwhelming.
For those who want a "scampi" feel, you can increase the butter and add a splash of dry white wine before the lemon juice. This creates a deeper, more complex sauce that's perfect for tossing with linguine.
- If you want it spicy
- Add 1/2 tsp red pepper flakes with the garlic.
- If you want it creamy
- Stir in 1 tbsp of heavy cream at the very end.
- If you want it zesty
- Double the parsley and add a bit of lemon zest.
Scaling Your Batch If you're feeding a crowd, don't just double everything in one pan. Shrimp need space to sear. If you have 2 lbs of shrimp, cook them in two separate batches.
If you crowd the pan, the shrimp will release too much moisture and you'll end up boiling them in a grey liquid instead of getting that golden brown crust. For the sauce, you can scale the garlic and butter by 1.5x rather than 2x, as the flavor stays very potent.
Storing and Saving Your Shrimp
If you have leftovers, store them in an airtight container in the fridge for up to 2 days. To reheat them without turning them into rubber, avoid the microwave. Instead, put them in a skillet over medium low heat with a tiny pat of butter. Just warm them through don't cook them again.
Freezing cooked shrimp isn't usually recommended because the texture changes significantly, but you can freeze the raw, seasoned shrimp in a single layer on a tray before bagging them. This makes them easy to pop into the pan for a quick meal later.
For zero waste, don't throw away the shrimp shells if you bought them shell on. Toss them in the freezer in a bag. Once you have enough, simmer them with an onion and a carrot to make a quick seafood stock. It's a brilliant way to add depth to risottos or seafood stews.
Plating Your Meal with Style
You don't need to be a pro to make this look great. I love serving these on a wide, shallow platter. Arrange the shrimp in a circle and pour the remaining garlic butter from the pan right over the center. The contrast of the pink shrimp against the green parsley and golden sauce is stunning.
For a more health focused bowl, serve the shrimp over a bed of sautéed spinach or roasted zucchini. The garlic butter acts as a natural dressing for the greens. If you're serving this as an appetizer, put a lemon wedge on the side of each plate so guests can add a fresh squeeze of citrus right before eating.
A simple sprinkle of extra black pepper or a pinch of flaky sea salt on top just before serving adds a professional touch. It's a simple dish, but when presented well, it feels like a special occasion meal every single time.
Recipe FAQs
How to make buttered garlic shrimp?
Heat butter and olive oil over medium high heat. Sear seasoned shrimp for 2-4 minutes total, then sauté minced garlic and deglaze with lemon juice.
What's the best way to cook garlic shrimp to avoid a rubbery texture?
Sear them quickly over medium high heat. Remove the shrimp from the pan immediately once they are golden brown to prevent overcooking.
Is it true that shrimp scampi should be made with boiled shrimp?
No, this is a common misconception. Boiling shrimp often results in a rubbery texture, whereas searing in a skillet creates a superior crust and flavor.
How to make a garlic shrimp dish similar to a classic scampi?
Sauté shrimp in butter and olive oil, then finish with minced garlic and lemon juice. For a more detailed approach, try this 15-minute scampi.
How to prepare this recipe for someone with diabetes?
Use the olive oil and lemon juice as listed. Since this recipe contains no added sugars, it is naturally friendly for diabetic diets when paired with fresh vegetables.
What is the secret to getting a golden brown sear on the shrimp?
Pat the shrimp completely dry with paper towels. Any moisture left on the surface creates steam, which prevents the shrimp from browning.
How to reheat leftover garlic shrimp without overcooking them?
Place them in a skillet over medium low heat with a small pat of butter. Gently warm them through instead of using a microwave to maintain the proper texture.
Easy Garlic Shrimp Recipe